How an Offset Smoker Works: Complete Guide
This post contains affiliate links. As an Amazon Associate, we earn from qualifying purchases.
You’ve hauled your offset smoker into the backyard, loaded with raw brisket, but that side-firebox design leaves you wondering: How does this metal contraption transform tough collagen into melt-in-your-mouth barbecue? Unlike pellet grills or electric smokers, an offset smoker operates on pure physics—no thermostats, no automation. When your meat develops that coveted pink smoke ring while neighbors’ burgers char on propane grills, you’ll understand why pit masters swear by this century-old design. This guide reveals the exact thermodynamics that make offset smokers the secret weapon for competition-level barbecue.
Forget complicated manuals. Within minutes, you’ll grasp why firebox placement, damper angles, and steel thickness dictate whether your brisket shines or suffers bitter creosote. We’ll decode the Venturi effect in your chimney, explain why thin blue smoke matters more than wood type, and show how to exploit natural temperature zones. Whether you’re battling wind gusts or chasing consistent 225°F, understanding how an offset smoker works turns guesswork into repeatable mastery.
Why Two Chambers? The Physics Behind Offset Smoker Heat Flow
Offset smokers leverage intentional heat separation through their dual-chamber design. The firebox—typically ¼ to ⅓ the volume of the cooking chamber—sits lower and welded to the barrel’s side. This positioning creates natural convection: hot combustion gases (around 800°F when properly managed) rise through the precisely sized throat opening (5-8 inches high), then travel horizontally across your meat before exiting via the chimney.
That chimney isn’t decorative—it’s engineering genius. A standard 4-inch diameter, 30-inch tall stack generates 2.5 Pascals of negative pressure at 275°F. This Venturi effect pulls 20-30 cubic feet of smoke per minute across your brisket, preventing stagnant air that causes bitter creosote buildup. Crucially, the cooking chamber’s horizontal orientation allows smoke to flow over food rather than through it like vertical smokers, preserving delicate textures while infusing deep flavor.
Critical Throat Gap Dimensions You Can’t Ignore
- Too narrow (<5″): Restricts smoke flow, causing firebox overheating above 400°F
- Too wide (>8″): Allows excessive heat loss, making temperature control impossible
- Optimal (5-8″): Maintains laminar flow for even cooking and clean smoke
Damper Control Secrets: Hit 225°F Every Time
Your firebox intake damper is the gas pedal—master it and you’ll never chase temperatures again. At 100% open, airflow floods the fire, rapidly spiking chamber temps to 325°F+. But close it to just 25% open (a 1-inch gap), and you achieve the holy grail of low-and-slow: stable 225°F cooking. This precise restriction creates ideal combustion—hot enough for clean blue smoke but cool enough for collagen breakdown.
Meanwhile, the exhaust damper stays 75-100% open—never close it more than halfway. Partially closing this choke point traps stale smoke, instantly coating meat in bitter creosote. Environmental factors dramatically impact your setup: a 10 mph crosswind can spike firebox temps 30-40°F, while dropping barometric pressure by 0.5 inches mercury cools burns by ~10°F. In 30°F weather, expect 25% more fuel consumption than at 80°F ambient.
Windproofing Your Smoke Session
- Position smoker perpendicular to prevailing winds
- Use temporary plywood windbreaks (keep 24+ inches from steel)
- Increase firebox fuel by 15% during gusty conditions
Charcoal Base + Wood Splits: The Perfect Fuel Combo for Clean Smoke
Forget “wood-only” myths—pros use charcoal as a stable heat foundation. Kingsford charcoal delivers 9,700 BTUs per pound with 45-60 minute burn times, creating consistent base heat. Then, add one 2-pound seasoned post-oak split (16″ long, 2-3″ diameter) perpendicular to the coals. This Texas favorite provides 8,600 BTUs with 30-40 minute burn cycles and mild, sweet smoke ideal for brisket.
The sequence is critical: Start with a chimney ¾ full of charcoal. Once coals glow red, spread them into a 2-inch bed. Place wood splits across the coals—not on top—to avoid smothering flames. Within 15 minutes, you’ll see thin, blue-white smoke—the only type that enhances flavor. Thick gray plumes mean incomplete combustion; open the intake damper 10% and reduce wood size immediately.
Fuel Management Timeline
- 0-45 min: Fire establishment (add pre-lit charcoal)
- 45-90 min: Primary smoke phase (add wood splits)
- Every 90 min: Tap ash pan to maintain airflow
- Every 4 hours: Refresh water pan with hot water
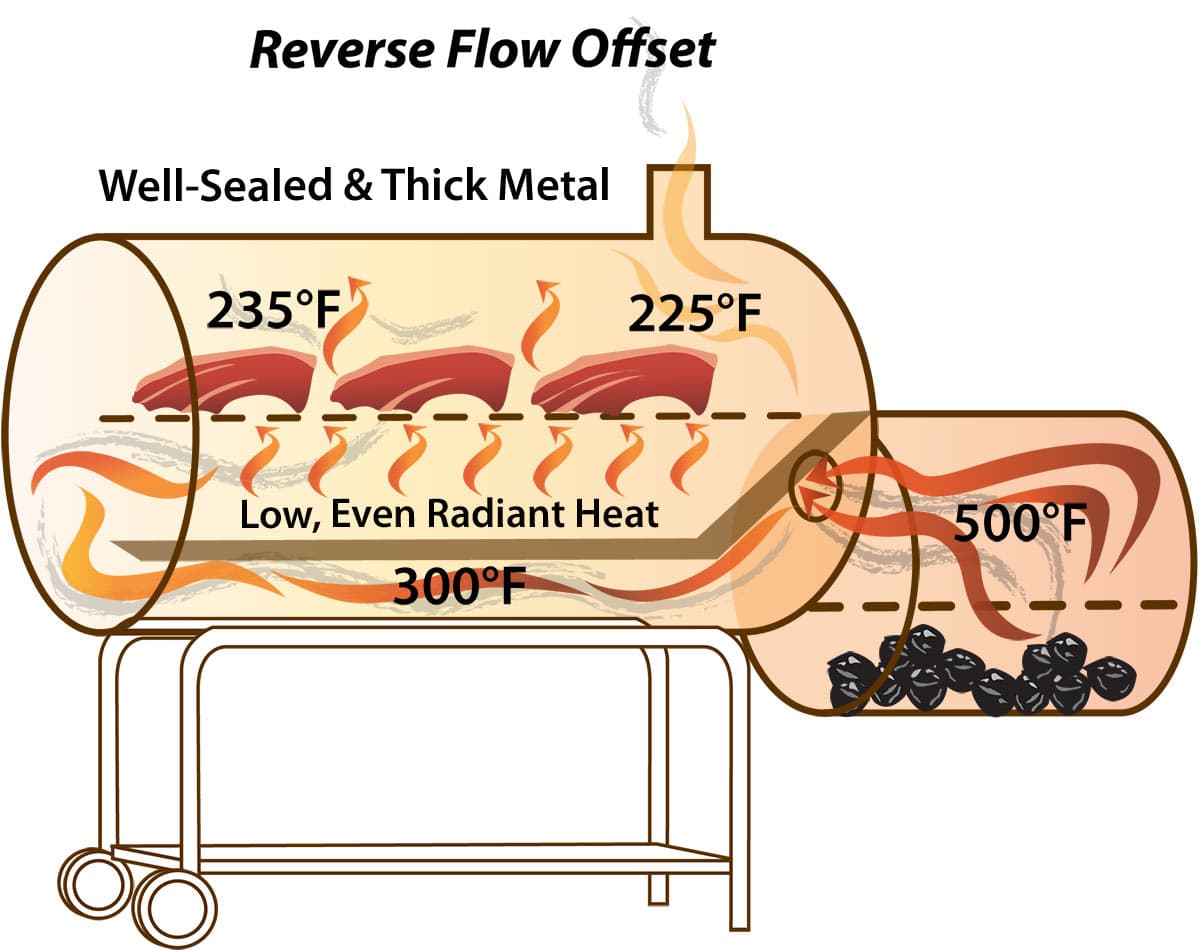
Traditional vs Reverse-Flow: Which Smoker Design Prevents Hot Spots?

Traditional offset smokers position the chimney at the cooking chamber’s far end. This creates natural temperature gradients—up to 40°F hotter near the firebox—perfect for multi-zone cooking. But reverse-flow systems add full-length steel baffles beneath the grates, forcing smoke to travel under and back over food before exiting through a firebox-end chimney. This design reduces end-to-end variance to just ±10°F and improves fuel efficiency by 15%.
Choose traditional if you want distinct zones: place ribs near the firebox for crisping while holding finished brisket at the cooler far end. Opt for reverse-flow when cooking large batches of uniform items like competition chicken. The trade-off? Traditional models (like Oklahoma Joe’s Highland) offer more cooking artistry, while reverse-flow rigs (Lang 36 Patio) deliver foolproof consistency.
Place Your Meat Right: Cooking Zones for Brisket, Ribs, and Chicken
Your offset smoker creates three natural temperature zones you must exploit. The firebox-adjacent area runs hottest (275-325°F)—ideal for finishing chicken skin or crisping pork belly. The middle section maintains the sweet spot of 225-250°F for low-and-slow brisket or pork shoulder. The far end stays coolest (190-210°F), perfect for holding finished meats or smoking delicate items like cheese.
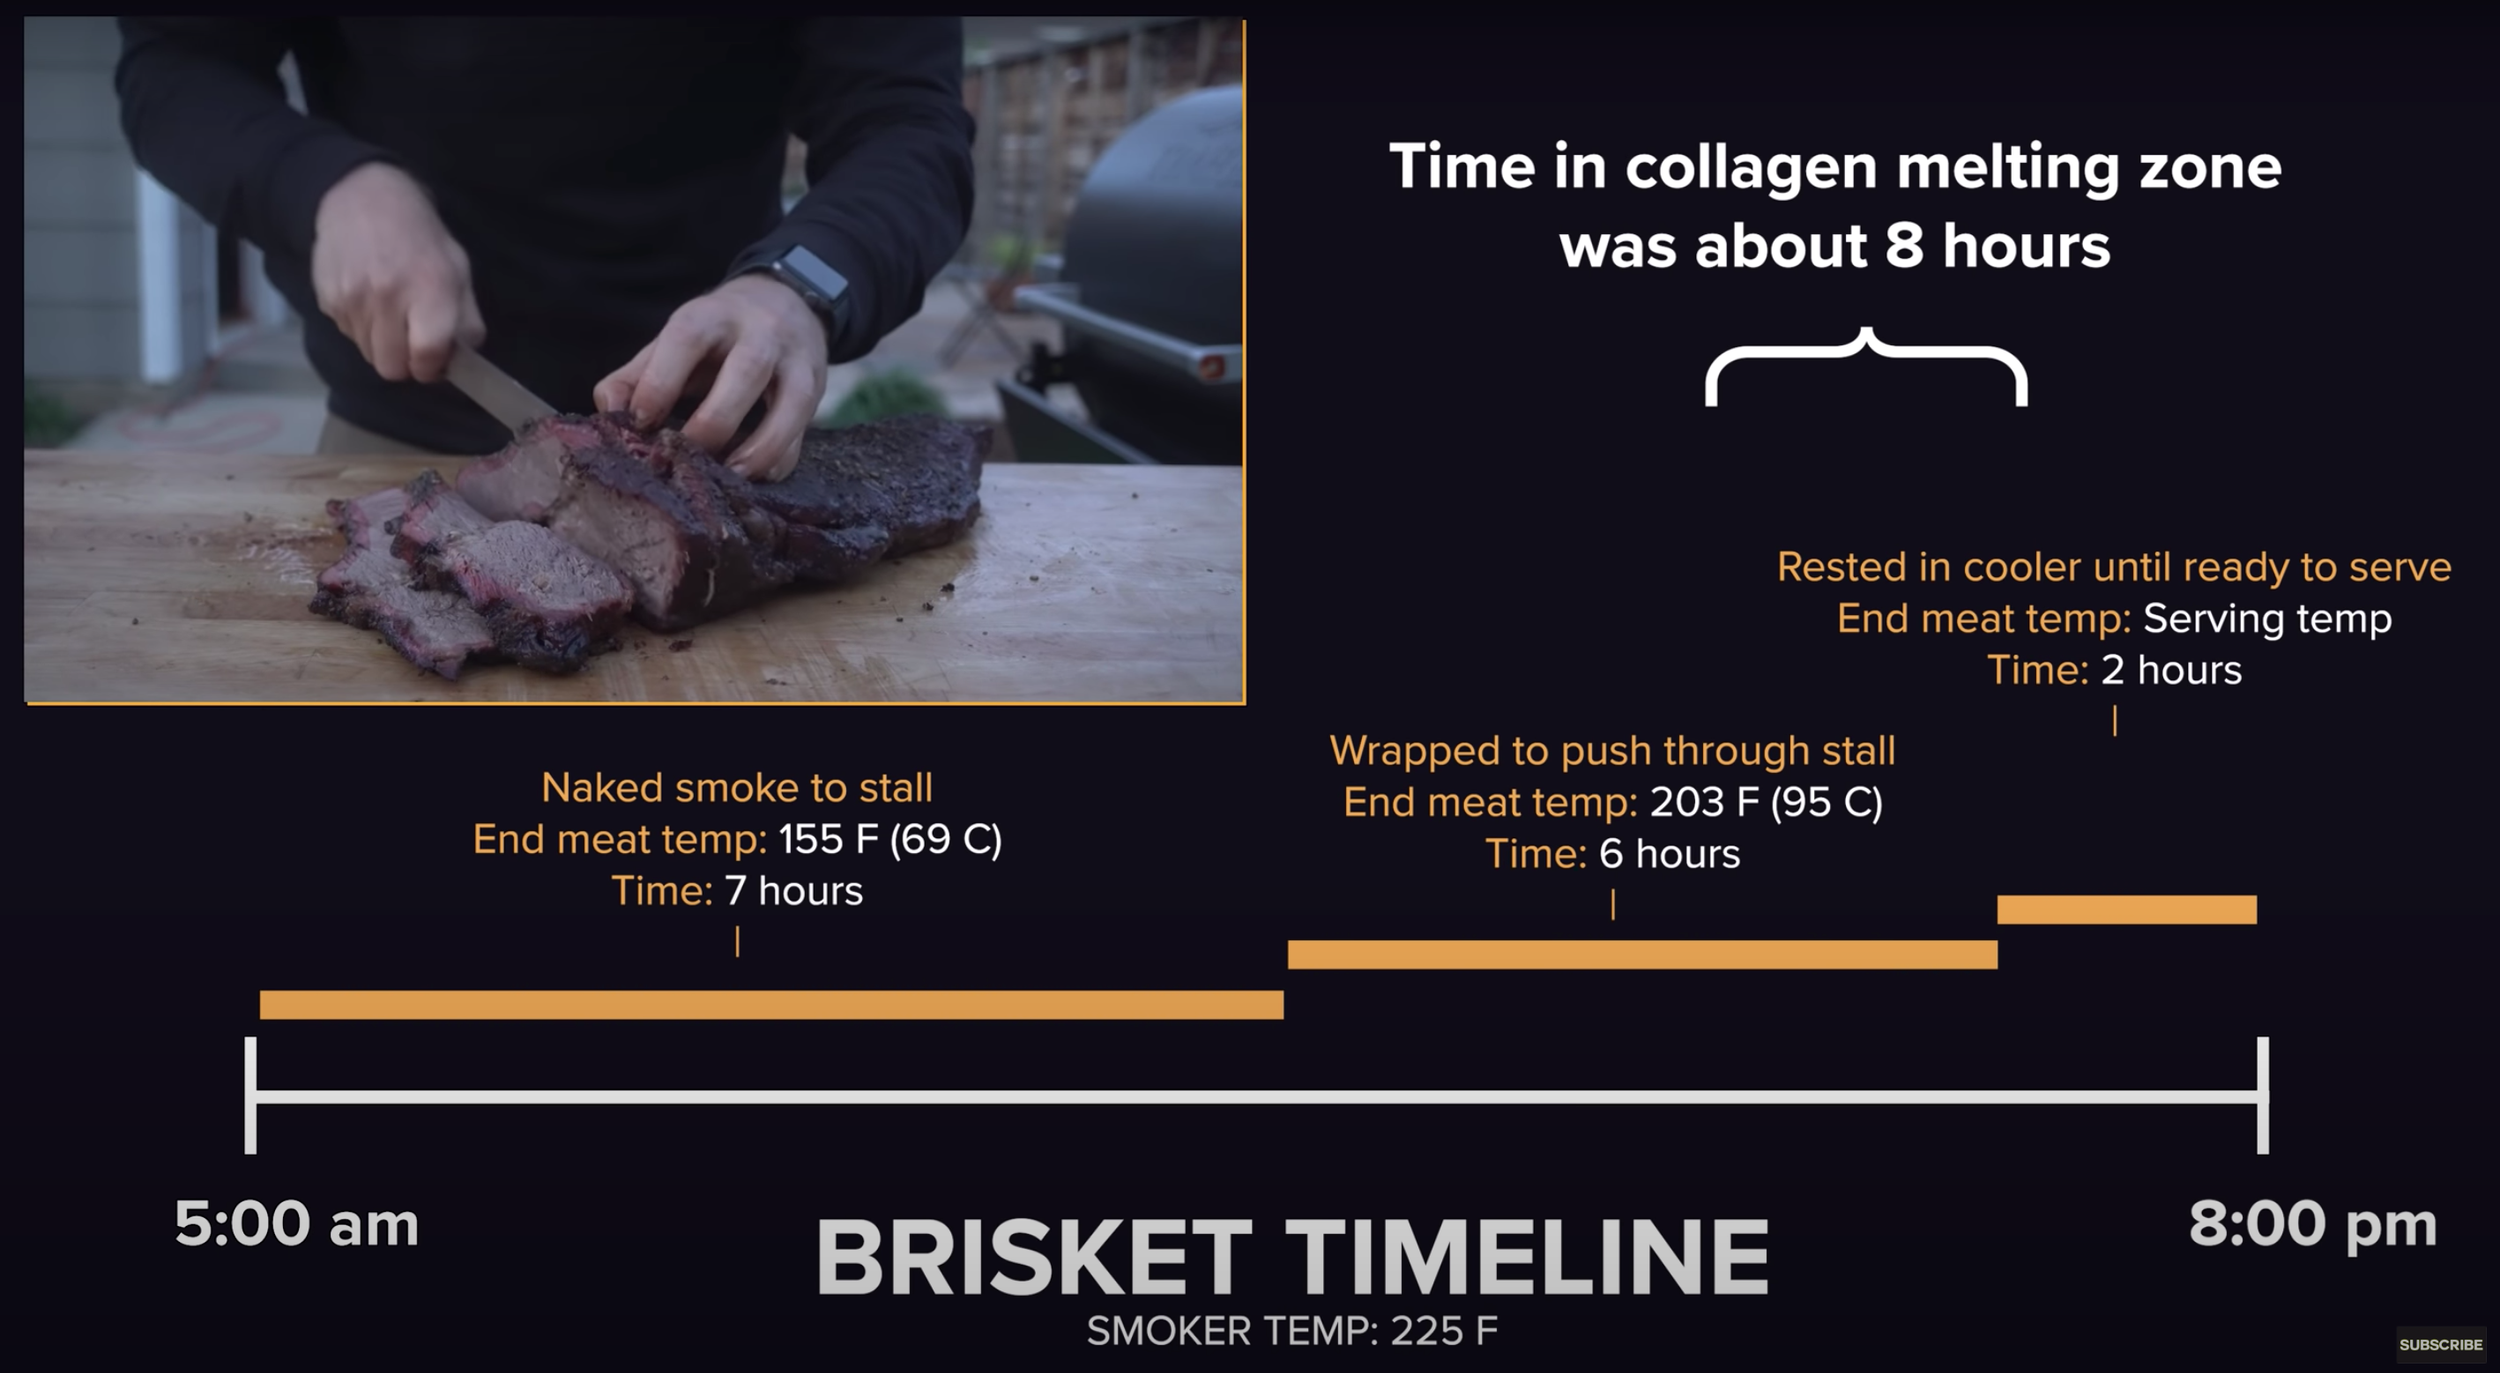
For a 12-pound brisket packer, position fat-side up in the middle zone. Expect 1-1.25 hours per pound at 225°F—roughly 12-15 hours total. Pork shoulder follows similar timing, while ribs using the 3-2-1 method need exactly 6 hours: 3 hours unwrapped, 2 wrapped, 1 glazed. Hot-and-fast cooks shine for tri-tip: at 350°F, it hits 135°F internal in 45-60 minutes. Never overlook your firebox grate—it’s perfect for searing steaks or grilling burgers directly over flames.
New Smoker Seasoning: 3 Critical Steps Before Your First Cook
Skip this and your first cook will taste like burnt paint. Season your smoker by running it empty at 300°F for 3 hours using wood splits (no charcoal). This polymerizes factory oils and seals microscopic pores in the steel. Next, calibrate thermometers: compare your built-in dial against a digital probe at grate level. Adjust the offset screw if readings differ by more than 15°F.
Finally, perform the dollar-bill test: close doors on a bill near seams. If it slides out easily, seal gaps with high-temp silicone or Lavalock gasket. Position tuning plates with ½-inch gaps near the firebox, expanding to 1-inch near the chimney. Place a 9″x13″ water pan filled with hot water on the lowest grate—replace every 4 hours to maintain 40-60% humidity for juicy results.
Stop Bitter Meat: Fix Dirty Smoke and Temperature Swings Now
Bitter, creosote-coated meat always means dirty smoke—never the wood type. Immediately open your intake damper 15% to increase oxygen flow. Switch to properly seasoned wood (12+ months dry) and use smaller splits; green wood creates thick gray smoke that ruins flavor. If temperature swings exceed 50°F, check for air leaks: replace worn damper springs and reseal door gaps.
Firebox overheating above 400°F indicates oversized wood splits or a partially closed exhaust damper. Reduce split size to 2 inches diameter and ensure the stack stays 100% open. For uneven cooking, adjust tuning plates in ¼-inch increments. Test heat distribution by placing bread slices on grates; darker toast reveals hot spots needing plate realignment.
Double Your Smoker’s Life: Daily and Seasonal Maintenance Checklist
Daily care prevents costly repairs: After cooking, empty the ash pan and wire-brush grates while warm. Spray with canola oil to prevent rust—never use vegetable oil (it polymerizes into gunk). Weekly during heavy use, vacuum the interior to remove grease buildup. Seasonally, inspect the chimney for creosote; scrape if deposits exceed ⅛-inch thickness.
Steel thickness dictates longevity. Budget smokers (1/16″ steel) last 2-4 years, while heavy-duty rigs like Yoder Cheyenne (¼” firebox steel) endure 15-25+ years. Touch up exterior paint chips immediately with high-temp spray paint (up to 1200°F). Quality brands like Lang and Meadow Creek offer lifetime warranties on chambers—keep your receipt!
Your First 10 Cooks: From Temperature Chaos to Pit Master Control
Expect your initial cooks to take 30-60 minutes just to stabilize temperatures within ±25°F. Start with forgiving chicken thighs—they tolerate wider temp swings than brisket. By cook #5, you’ll develop rhythm: adding pre-lit charcoal every 40 minutes while maintaining ±15°F. Track damper positions, fuel amounts, and weather in a logbook; this becomes your personal pit master playbook.
After 10+ cooks, muscle memory kicks in. You’ll recognize clean smoke by sight alone and instinctively adjust dampers for wind changes. Hitting ±5°F stability becomes routine, allowing flawless 12-hour brisket sessions. Remember: every competition pit master started with bitter ribs and temperature spikes. Mastery of how an offset smoker works transforms frustration into barbecue magic—one smoke ring at a time.
Pro Tip: Keep a detailed log of fuel amounts, damper positions, weather, and results for your first 20 cooks. This data reveals your smoker’s unique personality—far more valuable than generic temperature charts.