How to Clean Lawn Mower Air Filter
This post contains affiliate links. As an Amazon Associate, we earn from qualifying purchases.
Your lawn mower chokes on thick black smoke while guzzling fuel like a thirsty teenager at a soda fountain. Before you call a mechanic or panic about engine failure, check the air filter—it’s responsible for 90% of these symptoms. A clogged filter strangles airflow, forcing your engine into a fuel-rich death spiral that costs you money and shortens your mower’s lifespan. Ignoring this $5 component can trigger $300 repairs from internal engine damage.
The best way to clean lawn mower air filter takes less time than your morning coffee break and costs almost nothing. Whether you own a vintage push mower or a modern riding beast, this guide delivers the exact cleaning protocols for your specific filter type. No vague advice—just actionable steps to restore peak performance and avoid costly mistakes that destroy engines.
Identify Your Filter Type Before Touching Tools
Grabbing the wrong cleaning supplies for your filter guarantees disaster. Paper filters disintegrate if washed, while foam filters fail without proper re-oiling. This 30-second identification prevents irreversible engine damage.
Paper Filter Red Flags You Can’t Ignore
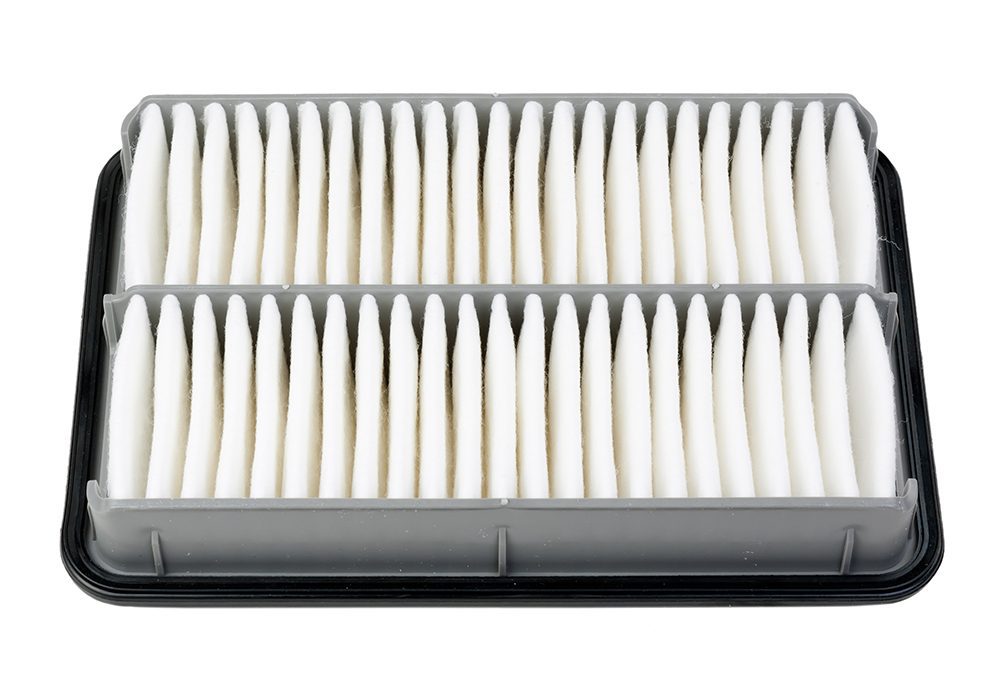
Spot these telltale signs on modern mowers: accordion-folded white or yellow paper sealed in plastic, typically mounted on the engine’s side. Never submerge paper filters in liquid—water ruptures the microscopic pores designed to trap dust. Even compressed air over 30 PSI blasts holes through the media. If sunlight reveals less than 50% visibility through the pleats, replacement is non-negotiable.
Foam Filter Cleaning Opportunities
Soft, spongy foam elements (often oil-coated) grace older push mowers. These tolerate washing but demand precise re-oiling. Dry foam types skip the oil step, but oiled versions require engine-grade SAE 30. If squeezing reveals tears, brittleness, or permanent oil stains, replacement beats risking engine contamination.
Dual-Element System Pitfalls
High-performance mowers combine foam pre-filters wrapped around paper cartridges. Clean the outer foam every 25 hours but never wash the inner paper element—dust storms demand paper replacement every 25 operating hours instead of the standard seasonal swap.
Gather Exact Supplies for Your Filter Type
Don’t waste time mid-cleaning hunting for tools. Match your kit to your filter:
Universal essentials:
– Safety gloves (hot engines burn)
– Screwdriver set for housing clips
– Lint-free microfiber cloths
– Soft-bristle brush for housing debris
Foam filter must-haves:
– Dish soap + warm water basin
– 1-2 tsp clean SAE 30 oil (critical for oiled foam)
– Sealable plastic bag for oil application
Paper filter non-negotiables:
– OEM replacement filter (aftermarket fits often leak)
– Low-pressure air compressor (≤30 PSI only if manual permits)
Safety Protocol That Prevents Garage Disasters
Skipping these steps risks burns, fires, or accidental blade engagement:
- Shut off engine and wait 15 minutes—exhaust manifolds exceed 400°F
- Disconnect spark plug wire by firmly pulling the rubber boot (not the wire)
- Wipe housing perimeter with dry cloth before opening to block debris entry
Access and Remove Filter Without Contamination
Push Mower Filter Extraction
Locate the palm-sized black housing on the engine’s side near the carburetor. Most use wing nuts or spring clips—release slowly to avoid dumping debris into the intake throat. Take a photo of the filter’s orientation before removal; backwards installation creates deadly air gaps.
Riding Mower Housing Access
Check under the hood atop the engine—larger housings often secure with latches. Support the housing as you open it; gravity can drop the filter into the carburetor. If grass clippings coat the cover, hose them off before opening.
Clean vs Replace Decision Flowchart

| Filter Condition | Paper Filter Action | Foam Filter Action |
|---|---|---|
| Light dust coating | Tap gently folds-down | Wash immediately |
| Dark gray/black | Replace NOW | Wash + re-oil |
| Oil saturation | Replace NOW | Wash thoroughly (may need replacement) |
| Physical damage | Replace NOW | Replace NOW |
Critical test: Hold paper filters to sunlight. Replace if light penetration drops below 50%.
Foam Filter Deep Clean Process That Prevents Oil Overload
Washing Steps That Avoid Damage
- Soak in warm soapy water for 5 minutes—never hot water (melts foam)
- Squeeze gently 10x—no twisting or wringing
- Rinse under lukewarm tap until water runs crystal clear
- Press between towels—never spin dry
- Air-dry 24+ hours away from direct sun (UV degrades foam)
Re-Oiling Technique Mechanics
Only for oiled foam types:
1. Confirm 100% dryness (press foam in paper towel—zero moisture transfer)
2. Place in zip bag with 1-2 tsp SAE 30 oil
3. Knead until uniformly amber—no drips allowed
4. Blot aggressively on paper towels until slightly tacky
Pro tip: Over-oiling causes black smoke—start with 1 tsp and add only if needed.
Paper Filter Quick Service That Extends Life
Paper filters can’t be truly cleaned but tolerate temporary fixes:
- Tap folds-down on concrete—loosens surface dust
- Blast inside→out with ≤30 PSI air (hold 6″ away)
- Replace immediately if oil-soaked, torn, or dark gray
Warning: Water or high-pressure air destroys paper filters. When in doubt, replace—it’s $8 versus $300 engine rebuilds.
Housing and Seal Maintenance You’re Skipping
90% of “clean filter” failures trace to contaminated housing:
- Sweep interior with dry brush—never use solvents (dissolves sealants)
- Inspect rubber gasket for cracks—replace if compressed
- Wipe mating surfaces with dry cloth before reassembly
Reinstall and Test Like a Pro
Installation Checklist
- Filter seated with airflow arrow toward engine (if marked)
- Zero gaps around filter edges
- Cover tightened snugly—not hand-tight plus a quarter-turn
- Spark plug clicked securely into place
Post-Service Test Drive
Run engine 2 minutes at idle. Success signs:
– Steady RPM (no surging)
– No hissing from housing
– Instant blade engagement without bogging
Troubleshooting Filter Service Failures
Engine Won’t Start After Cleaning
- Check filter orientation—backwards = zero airflow
- Verify spark plug connection—loose boot prevents ignition
- Clear debris from carburetor throat with compressed air
Black Smoke Post-Cleaning
- Blot foam filter longer—excess oil burns rich
- Run engine 10 minutes to burn off residual oil
- Reduce oil amount next cleaning cycle
Rapid Re-Clogging Causes
- Replace cracked housing gasket—unfiltered air bypass
- Double cleaning frequency in dusty conditions
- Inspect carburetor for fuel leaks saturating filter
Maintenance Schedule That Prevents 80% of Issues
Normal conditions (weekly mowing):
– Visual check: Every month
– Foam service: Every 25 hours
– Paper replacement: Annually
Dusty conditions (construction zones, dry fields):
– Visual check: Every 10 hours
– Foam service: Every 10 hours
– Paper replacement: Every 25 hours
Pro storage tip: Before winter, replace filters and cover intake with plastic bag—rodents love nesting in paper elements.
Quick Reference Checklist
Tape this inside your shed:
– [ ] Engine cool, spark plug disconnected
– [ ] Filter type confirmed (paper/foam/dual)
– [ ] Paper: Replaced | Foam: Washed & dried 24h
– [ ] Foam re-oiled evenly (tacky, not dripping)
– [ ] Housing cleaned, seal intact
– [ ] Filter reinstalled with airflow arrow correct
– [ ] Engine tested 2 minutes at idle
Your air filter is the engine’s lungs—ten minutes of maintenance saves hundreds in repairs and keeps fuel costs down. By following the best way to clean lawn mower air filter for your specific model, you’ll transform sputtering starts into smooth cutting and extend your mower’s life for years. Ignoring this tiny component is the fastest route to a dead engine; mastering it is the cheapest performance upgrade you’ll ever make.