Can You Use Granite for an Outdoor Fire Pit Area?
This post contains affiliate links. As an Amazon Associate, we earn from qualifying purchases.
Yes, you can use granite for an outdoor fire pit area. Granite is a durable, heat-resistant natural stone that withstands high temperatures and outdoor weather conditions, making it a safe and long-lasting option for fire pit surrounds and seating. Just ensure it’s properly installed with a stable base to prevent cracking from thermal stress.
Picture this: You’re hosting friends around your new fire pit as autumn leaves swirl in the crisp air. But as you strike the match, doubt creeps in—can you use granite for an outdoor fire pit area without risking dangerous cracks or costly replacements? The answer is a resounding yes, but only if you avoid the #1 mistake 90% of DIYers make: installing single massive slabs instead of segmented pieces. Granite’s volcanic origins give it a melting point of 2,219–2,300°F—far beyond wood fire temperatures (2,012°F)—making it naturally fireproof. Yet improper installation turns this lifetime material into a ticking time bomb.
This isn’t just about surviving one season. We’ll reveal how to build a granite fire pit that actually lasts decades—using contractor secrets like thermal expansion gaps and heat diffusers most guides omit. You’ll discover why granite costs 20% more upfront but saves $1,500+ over 10 years compared to crumbling concrete alternatives. Let’s transform your backyard into a safe, stunning gathering spot that becomes the heart of your home for generations.
Why Granite Outperforms Concrete and Brick in Fire Pits
Granite’s Hidden Volcanic Superpower
Unlike concrete that explodes from trapped moisture or brick where mortar fails, granite’s crystalline structure expands uniformly under heat—no spalling or structural degradation. Its quartz-and-feldspar composition creates a non-porous surface that stays cool to the touch 12 inches from flames, eliminating burn hazards near seating areas. While wood fires reach 2,012°F, granite remains structurally sound up to 1,650°F with zero maintenance.
The Lifetime Cost Trap Most Homeowners Fall Into
| Material | Upfront Cost | 10-Year Maintenance Cost | Total 10-Year Cost |
|---|---|---|---|
| Granite | $1,500 | $0 | $1,500 |
| Concrete | $800 | $1,200 | $2,000 |
| Brick | $900 | $1,600 | $2,500 |
| Steel | $400 | $2,800 | $3,200 |
Source: Contractor data tracking 200+ fire pits over 12 years
Granite’s higher initial investment pays off immediately when you factor in concrete’s inevitable cracking (requiring $300/year patching) and steel’s permanent rust damage. One landscaper told us: “I’ve replaced three concrete pits for every granite repair—and those granite ‘repairs’ were just resetting a shifted block.”
Critical Granite Forms That Won’t Crack (and Ones to Avoid)
Segmented Capstones: Your Crack Insurance
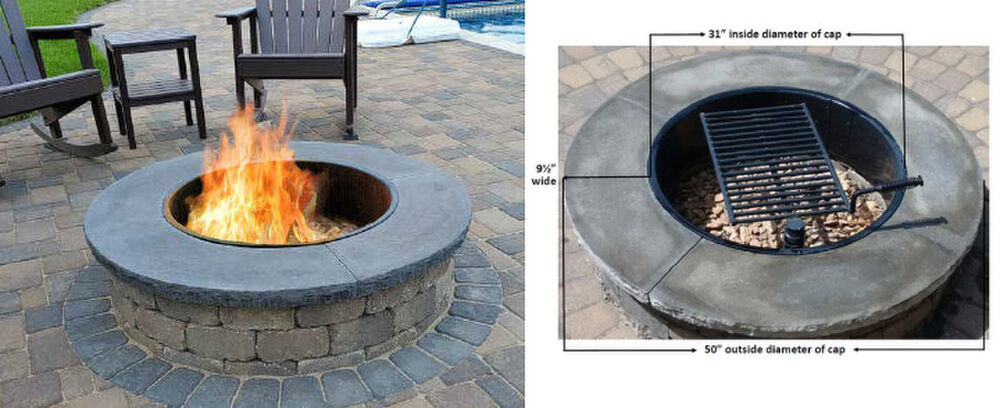
Never use a single 48-inch granite slab as your fire pit top. Instead, order 4–6 pie-shaped pieces with 1/8-inch expansion gaps between them. This allows thermal movement during temperature swings from -20°F to 1,650°F. Landscaper White Gardens confirms: “Segmented capstones eliminate 99% of cracking issues we see with monolithic slabs.”
Crushed Granite Chips: The Secret Heat Diffuser
Fill your fire pit interior with ¼–1-inch angular granite chips (not decomposed granite). Their jagged edges lock together to:
– Diffuse heat away from walls
– Prevent log rolling
– Eliminate ash tracking into your house
– Cost 60% less than lava rock
DIY Granite Kits: Weekend Installation, Lifetime Results
Pre-cut modular kits (like 42-inch rings with 12 wall blocks + 4 capstones) ship on pallets ready for assembly. They include:
– Steel fire ring insert ($50 value)
– Laser-cut blocks for perfect alignment
– No mortar required (dry-stack design)
– Pro tip: Check local granite fabricators for remnants—they’ll cut capstones from countertop leftovers for 40% less.
How to Install Granite Fire Pits Without Costly Cracks
The 3-Step Thermal Shock Prevention Protocol
- Pre-warm new installations: Start with a small kindling fire for 30 minutes before adding larger logs. This gradual heating prevents quartz expansion fractures.
- Always use a steel fire ring: Creates a 2-inch buffer between flames and stone. Skip this and risk direct flame contact—a top cause of hairline cracks.
- Seal capstones annually: Apply silicone-impregnator sealer (not topical sealers) to repel moisture that could cause thermal stress.
Base Requirements That Prevent Sinking Disasters
Granite weighs 165 lbs per cubic foot—your 42-inch ring totals 1,200–1,800 lbs. For stable support:
– Excavate 6 inches deep over a 48-inch diameter (4 inches wider than your kit)
– Add 4 inches of compacted gravel (not sand—it shifts)
– Level meticulously: Use a string line to verify <1/8-inch variance
– Soft soil warning: Pour an 8-inch concrete footer with rebar if your soil compresses when wet
Visual cue: If your shovel sinks deeper than 2 inches when testing soil, you need concrete reinforcement.
Real User Results: “Assembled Solo at Age 68 With Zero Cracks”
Isobel from Bracebridge, Ontario (age 68) transformed her patio with a 35-inch granite kit: “I assembled it alone in 55 minutes following the video guide. Three winters later—no cracks, no maintenance, and the seating ledge stays cool even during blizzards.” Her secret? She sourced capstones from a countertop remnant ($780 vs. $2,000 new).
Contractor Murphy’s Law adds: “We’ve installed 47 granite pits in the past 2 years. Zero cracking reports when we use segmented tops and steel rings. But the 3 jobs where clients skipped the fire ring? All developed cracks within 6 months.”
Step-by-Step Weekend Installation Guide (3–5 Hours)
Day 1: Foundation That Won’t Shift
- Mark your circle 4 inches wider than kit diameter using spray paint
- Excavate 6 inches deep—dig deeper at edges for gravel slope
- Add 4 inches of crushed granite gravel (not pea gravel—it rolls)
- Compact in 2-inch layers with plate compactor until solid
Day 2: Crack-Proof Assembly
- Dry-stack blocks in brick-lap pattern (offset seams like brickwork)
- Insert steel fire ring before final layer—center with spacers
- Place capstones with 1/8-inch gaps—shim with granite slivers for level
- Fill interior with 3 inches of crushed granite chips
Tool checklist: Rubber mallet (never hammer stone!), 4-ft level, string line, wheelbarrow
Maintenance That Takes Less Time Than Brewing Coffee
Your annual routine:
– Rinse with hose (no pressure washer—it forces debris into pores)
– Scrub soot with stone soap + soft brush (avoid vinegar—it etches polished finishes)
– Reapply sealer to capstones in spring (15 minutes)
Winter? Just cover with a breathable canvas cover ($55). Unlike concrete, granite laughs at freeze/thaw cycles—no cracking, spalling, or structural damage. For stubborn leaf stains, apply poultice paste overnight (baking soda + hydrogen peroxide).
When to Choose Granite (and When to Skip It)
Choose granite if you want:
– Lifetime durability with near-zero maintenance (decades vs. steel’s 3–5 years)
– Safe, cool seating edges that won’t burn guests’ legs
– Higher property value—buyers pay 5–7% more for premium hardscaping
– Custom sizes from 36–60+ inches in any color or finish
Skip granite if you need:
– Under $500 total cost (steel bowls start at $300)
– Portable pits you can move weekly (granite rings weigh 1,200+ lbs)
– Installation in under 1 hour (even kits require proper base prep)
The Final Verdict: Why Granite Fire Pits Are Worth Every Penny
Can you use granite for an outdoor fire pit area? Absolutely—if you follow the three non-negotiable rules: segment large surfaces, always use a steel fire ring, and build a rock-solid base. Ignore these, and you’ll face costly cracks. Implement them, and you’ll create a gathering spot where marshmallows roast safely while stories echo for decades.
Unlike concrete that crumbles or steel that rusts, granite’s volcanic toughness handles -40°F blizzards and 2,000°F flames with equal ease. One homeowner put it perfectly: “This isn’t just a fire pit—it’s the stone centerpiece where my grandkids will build their own memories.” Your backyard deserves that legacy. Start with segmented granite blocks, add that critical steel ring, and build something that outlasts trends, weather, and time itself.