How to Fix Char Broil Electric Smoker Not Heating
This post contains affiliate links. As an Amazon Associate, we earn from qualifying purchases.
You’ve prepped your brisket, soaked the wood chips, and powered up your Char-Broil smoker—only to watch helplessly as the temperature gauge stubbornly stays near room temperature. The digital display glows, the timer counts down, but the heating element remains completely cold. This exact failure pattern strikes Char-Broil Model 14202002 owners repeatedly, turning planned smoking sessions into emergency oven cooking. Don’t panic: over 90% of these “won’t heat up” cases trace back to just three repairable electrical failures that you can diagnose with basic tools.
Most cold-start failures originate at the heating element connections—not the control panel. When aluminum spade connectors corrode or crimps loosen, resistance skyrockets at the connection point. This creates intense localized heat that burns wire insulation while leaving the digital controls fully functional. The good news? You can pinpoint and fix this issue in under an hour with a $10 multimeter. This guide delivers the exact diagnostic sequence used by hundreds of successful DIY repairs, complete with model-specific part numbers and critical safety checks.
Diagnose Burnt Element Connections in 5 Minutes
The most common culprit behind cold Char-Broil smokers is burnt wiring at the heating element terminals. When you remove the rear cover plate (secured by T-20 or Phillips screws), look for these dead giveaways: blackened, crispy insulation near the element leads; green or white fuzzy corrosion on aluminum connectors; or spade terminals that wiggle freely under finger pressure. These visual clues indicate excessive resistance has literally cooked the wiring harness while the control panel remained operational.
Critical warning: Never skip the unplugging step before inspection. Allow 10 minutes for capacitor discharge in the digital control board even after unplugging. Document any damage with photos—they’re essential when ordering replacement parts. If you spot charred insulation or corrosion, you’ve almost certainly found your problem. The control panel keeps functioning because it runs on a separate circuit, creating the illusion that “everything’s powered on” while no electricity reaches the heating element.
Why Aluminum Connectors Fail Repeatedly
Char-Broil’s factory-installed aluminum spade connectors create a perfect storm for failure. Aluminum oxidizes rapidly when exposed to moisture and heat, forming white or green corrosion that increases electrical resistance. This resistance generates intense heat at the connector point—hot enough to melt wire insulation—while the digital controls stay unaffected. Crucially, these failures often occur after just 10-15 cooking sessions, especially in humid environments where moisture accelerates galvanic corrosion between the aluminum connectors and steel element legs.
Test Your Heating Element with a Multimeter

Before replacing parts, confirm whether your heating element has failed internally. Grab a multimeter and follow this precise sequence:
- Unplug the smoker completely and disconnect both spade connectors from the element terminals
- Set your multimeter to resistance (Ω) mode and touch probes to the bare element terminals
- Interpret these critical readings:
– 10-40 ohms: Element is functional (expected for 750W/120V units)
– Infinite resistance (OL): Internal coil break—replace element immediately
– Under 5 ohms: Dangerous short circuit—do not operate
Pro tip: Always test element-to-ground by touching one probe to an element terminal and the other to the metal chassis. Readings under 2 megaohms indicate a compromised element that could cause electrical shocks—replace it without delay. If you measure 108-125V at the element leads when the controller calls for heat but still get no warmth, suspect the high-limit thermostat instead.
Replace Burnt Connectors with High-Temp Upgrades
Replacing the factory aluminum connectors with nickel-plated steel versions solves 80% of cold-start failures permanently. Here’s the exact repair sequence:
Gather these specific parts:
– Nickel-plated high-temp female spade connectors (McMaster-Carr 7684K42)
– 14-16 AWG high-temp wire (same gauge as original)
– Dual-wall heat shrink tubing rated to 125°C
Execution steps:
1. Cut back burnt wire until you expose bright copper strands
2. Strip precisely ¼ inch of insulation using wire strippers
3. Crimp new connector with a ratcheting crimp tool (never use standard pliers)
4. Slide heat shrink over the joint and shrink with a heat gun
Critical mistake to avoid: Standard automotive connectors fail within weeks under smoker temperatures. Only use nickel-plated steel terminals rated for 900°F like the 7684K42 series. After reassembly, perform a tug test—any movement at the crimp means you must redo the connection.
Order Correct Model-Specific Replacement Parts

When element replacement becomes necessary, these exact specifications prevent costly mistakes:
| Component | Critical Specs | Part Number | Verification Tip |
|---|---|---|---|
| Heating Element | 750W, 120V, M8 threaded studs | 29102045 | Measure leg spacing before ordering |
| High-Limit Thermostat | Manual reset 150°C or 180°C | Generic Klixon 47 series | Match mounting holes & temp rating |
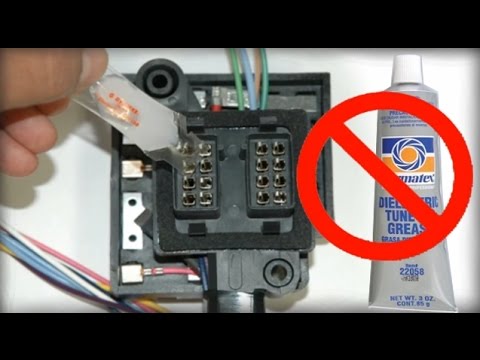
| Dielectric Protector | Silicone-based | Permatex 22058 | Spray on connectors every 6 months |
Pro tip: Call Char-Broil’s parts line (1-866-239-6777) with your model number (14202002) and serial number (found inside cabinet) before ordering. Many users accidentally buy elements with mismatched terminal types—confirm yours uses ¼” spades or M8 threaded studs. For thermostat replacements, generic Klixon switches cost 70% less than OEM parts while fitting perfectly.
Prevent Recurring Failures with Proactive Maintenance
Smart maintenance stops 90% of cold-start failures before they happen. Implement this battle-tested schedule:
After every 3 smokes:
– Inspect the rear cover for moisture intrusion
– Tighten all electrical connection screws with a Phillips driver
Every 6 months:
– Remove rear cover and spray spade connectors with Permatex 22058 dielectric silicone
– Check for early wire discoloration or connector movement
Annually:
– Test element resistance and ground leakage with multimeter
– Replace connectors proactively if showing white corrosion
Storage secret: Always use the manufacturer’s cover or store indoors. Moisture accelerates aluminum connector corrosion—keeping your smoker dry prevents the #1 failure mode. Document your resistance readings each year; sudden changes signal impending failure.
When to Repair vs Replace Your Smoker
Evaluate these factors before investing repair time:
Repair makes sense when:
– Only connectors or element need replacement (under $50 parts)
– Your unit is under 3 years old
– You’re comfortable with basic electrical work
Replace the entire smoker when:
– Element costs exceed 50% of a new unit’s price ($100+)
– Multiple components show damage (wiring harness + control board)
– The unit is over 5 years old with previous repairs
Cost reality check: Professional repairs often cost $100-$150—frequently exceeding the smoker’s value. Most DIY repairs take under 60 minutes once you have parts. If your element tests open (OL reading) but connectors look pristine, suspect the high-limit thermostat—a $15 part requiring 20 minutes to replace.
Stop GFCI Tripping Immediately
If your smoker trips GFCI outlets the moment you plug in, follow this diagnostic sequence:
- Plug into a non-GFCI indoor circuit for 30 seconds (observe safety precautions)
- If it still trips, the heating element has a pinhole leak—replace immediately
- If it runs normally, moisture in the electrical box is the culprit
Critical warning: Never use standard extension cords. If absolutely necessary, use only 12 AWG, 3-conductor SJTW cord under 25 feet to prevent voltage drop. Longer or thinner cords cause undervoltage that mimics “won’t heat” symptoms while overheating the cord itself.
Final 30-Minute Test Protocol After Repairs
Never skip this verification sequence after any repair:
- Reassemble all covers and connections securely
- Plug into a GFCI outlet for safety monitoring
- Set temperature to 225°F and monitor the first 10 minutes
- Success indicators: Element glows red within 5 minutes, temperature climbs steadily, no burnt smells
- Verify it reaches 200°F within 15 minutes
- Document resistance values for future reference
Red flags requiring immediate shutdown: Unusual buzzing sounds, GFCI trips during test, or smoke from electrical connections. If the element glows but temperature stalls, check the door seal alignment—loosen the three bracket screws, realign the gasket, and retighten evenly.
With these precise diagnostic steps and model-specific fixes, you’ll transform your cold Char-Broil smoker into a reliable heat source again. Most connector replacements take under 45 minutes using basic tools, and proactive maintenance prevents repeat failures. Keep a $15 connector repair kit in your grill toolbox—once these connections fail, they tend to recur without upgraded nickel-plated terminals. By following this guide, you’ll spend less time troubleshooting and more time enjoying perfectly smoked ribs that actually reach the right temperature. Remember: when your Char-Broil won’t heat up, the problem is almost always fixable with the right parts and procedures.