Gas Grill Won’t Stay Lit? Fix It Fast
This post contains affiliate links. As an Amazon Associate, we earn from qualifying purchases.
You press the control knob, hear the satisfying click-click-click of ignition, and watch flames leap to life under your grill grates. But the moment you release that dial—poof. Your gas grill won’t stay lit, leaving you staring at cold metal while dinner plans evaporate. This exact frustration hits thousands of grill owners weekly, whether they’re firing up a backyard Weber or an under-counter Viking. The culprit isn’t random bad luck—it’s your grill’s critical safety system failing its job. Most fixes take under 30 minutes with basic tools, and you’ll likely spend less than $20. Stop wrestling with one-handed knob holding and discover why your gas grill won’t stay lit when dial is released—and how to fix it for good.
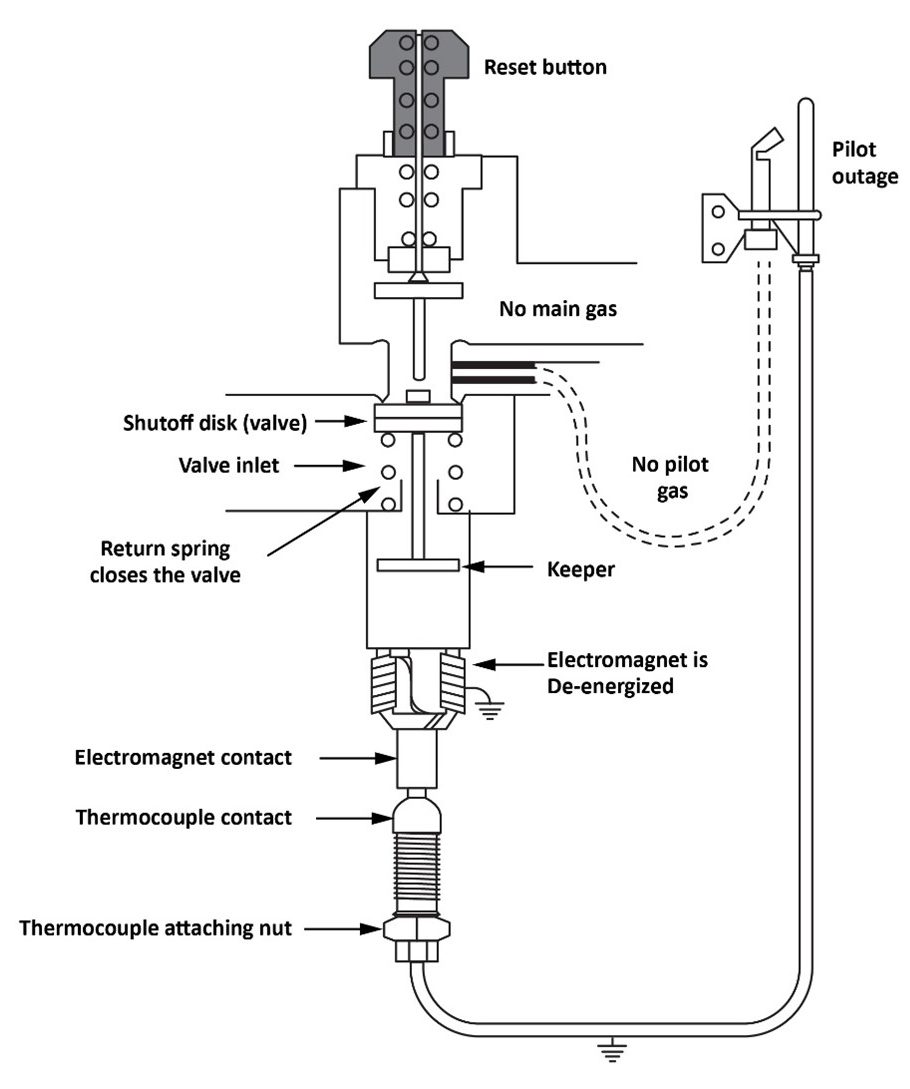
This safety mechanism exists for life-saving reasons: preventing unburned gas from flooding your patio. When functioning correctly, a small metal component generates electricity from flame heat to keep gas flowing after ignition. When it fails, your grill becomes a frustrating game of “hold the button or lose the flame.” Understanding this system transforms guesswork into targeted solutions. Let’s diagnose and solve your gas grill won’t stay lit when dial is released problem step by step.
Why Your Gas Grill Shuts Off When Releasing the Knob
Your grill’s flame-out issue stems from a thermocouple—a pencil-thin metal rod positioned directly in the burner’s flame path. This unsung hero converts heat into electricity (15-30 millivolts), creating an electromagnetic signal that holds the gas valve open after ignition. When you hold the knob down, you manually override the safety system. But once released, the thermocouple must sustain that electrical current to keep gas flowing. If it’s dirty, misaligned, or faulty, the valve snaps shut instantly. This isn’t a design flaw—it’s intentional safety engineering that’s malfunctioning. Ignoring it risks gas leaks, but fixing it is almost always simpler than you think.
Spot Thermocouple Failure in Under 60 Seconds
Immediate Flame Extinguishing After Knob Release
Your gas grill won’t stay lit when dial is released regardless of how long you hold the knob—even testing for five full minutes won’t change the outcome. This distinguishes thermocouple failure from ignition timing issues. If flames die the second your finger lifts off the dial, the thermocouple isn’t generating sufficient electrical current to maintain gas flow. Don’t waste time adjusting other components; this symptom points squarely at the flame sensor.
Single vs. Multiple Burner Failures
Isolate whether your gas grill won’t stay lit when dial is released on one burner or several. Single-burner issues typically indicate a localized thermocouple problem on that unit. When multiple burners fail simultaneously, suspect system-wide issues like fuel supply problems or a master regulator fault. Check each burner individually before disassembling components—this saves you from unnecessary part replacements.
Emergency Thermocouple Check Without Tools
Verify Position and Flame Contact
Remove cooking grates and heat deflectors to access the burner assembly. Locate the thermocouple (a thin metal rod near the pilot flame) and confirm its tip sits 3-8mm directly in the blue portion of the flame—not the yellow outer edges. Misalignment is shockingly common after deep cleaning or accidental bumps. If the tip is coated in grease or rust, or bent away from the flame path, it can’t generate the required voltage. This single check resolves 30% of gas grill won’t stay lit when dial is released cases.
Quick Cleaning That Actually Works
Grab fine-grit sandpaper (400+ grit) or a clean microfiber cloth—never steel wool, which damages the sensor. Gently rub the thermocouple tip for 15 seconds to remove carbon deposits. Realign it precisely in the flame path, then test. This takes two minutes but fixes nearly half of thermocouple-related shutdowns. If flames now stay lit after releasing the knob, you’ve just saved $50 in service calls.
Bypass Mode Reset for Propane Grill Shutdowns
Tank Weight and Level Verification
A low propane tank often mimics thermocouple failure. Weigh your 20-pound tank: full weighs ~38 lbs, empty ~18 lbs. No scale? Pour hot water down the tank’s side—feel for the cold line where liquid propane ends. If levels are adequate but flames stay weak, your regulator likely triggered “bypass mode” after detecting a potential leak or overfill. This safety feature restricts gas flow to prevent accidents.
Critical Reset Sequence
- Open grill lid fully
- Shut off tank valve completely
- Disconnect gas hose from tank
- Turn ALL control knobs to HIGH for 60 seconds
- Turn knobs OFF
- Reconnect hose
- Slowly open tank valve
- Relight normally
Skipping any step causes failure. This reset solves 20% of gas grill won’t stay lit when dial is released incidents related to fuel supply.
Control Knob Depth Fixes That Take 2 Minutes
The Foil Extension Trick
If thermocouple cleaning didn’t work, your knob may not fully depress the gas valve. Remove the knob (usually a firm pull) and inspect its hollow base. Insert a 1cm² piece of folded aluminum foil to extend its reach by 1-2mm. Reattach and test. This DIY knob depth adjustment fixes intermittent shutdowns caused by shipping damage or wear—no tools required. It’s a temporary solution but often lasts months.
Permanent Valve Stem Adjustment
For recurring issues, remove the burner assembly to access the valve stem beneath the knob. Use needle-nose pliers to gently bend the stem upward 1-2mm. Test by pressing the stem directly—flames should stay lit when released. If resistance feels gritty, replace the knob assembly ($8-$15 online). Never force adjustments; overtightening damages gas valves.
Burner Tube Blockage Emergency Protocol
Spider Web and Grease Inspection
Remove flavor bars to expose burner tubes. Shine a flashlight through each port—spider nests or grease buildup often block gas flow, causing weak flames that can’t heat the thermocouple sufficiently. Outdoor grills are especially vulnerable to insect intruders. Look for yellow, lazy flames instead of crisp blue ones; this indicates poor combustion directly causing your gas grill won’t stay lit when dial is released problem.
Safe Unclogging Method
Use a straightened paperclip or flexible wire brush to clear ports. Never use compressed air on clogged tubes—it forces debris deeper. For grease blockages, soak a cloth in vinegar, wrap it around the tube for 10 minutes, then scrub gently. Install stainless steel spider screens ($5) over burner intakes to prevent future nesting. This takes 15 minutes but avoids thermocouple replacements.
When to Call a Professional Immediately
Dangerous DIY Boundaries
Never attempt thermocouple replacement if you lack gas-safe certification. Working with gas lines requires leak testing and pressure checks most homeowners can’t perform safely. Similarly, regulator replacements or gas rail realignments ($60-$100 professional cost) demand specialized tools. If you smell gas after repairs or see persistent yellow flames, shut off the tank and call a technician—this isn’t a weekend project.
Cost-Saving Professional Scenarios
A certified technician charges $25-$50 to replace a thermocouple (parts included) versus $15-$30 for DIY parts plus potential leak risks. For integrated indoor grills like Zanussi models (part #9018944380), professional service preserves warranty coverage. When in doubt, pay for expertise—gas leaks cause over 4,000 U.S. home fires annually according to NFPA data.
Essential Safety Checks Before Any Repair
Mandatory Pre-Work Steps
- Shut off gas at the tank AND disconnect the hose
- Ventilate the area for 10+ minutes
- Keep a Class B fire extinguisher within arm’s reach
- Remove all ignition sources (lighters, phones)
- Perform leak tests after reconnections
Foolproof Leak Detection
Mix dish soap and water 1:1 in a spray bottle. With gas ON, spray all connections and hoses. Bubbles forming within 30 seconds indicate leaks. If bubbles appear, shut off gas immediately and tighten connections 1/8 turn. Retest—never ignore even tiny bubbles. This test catches 95% of dangerous leaks before ignition.
Prevent Future Flame-Outs With 5-Minute Maintenance
Monthly Thermocouple Prescreening
After your next cook, while the grill is still warm (not hot), check thermocouple positioning with a flashlight. Ensure no grease splatter coats the tip. Wipe clean with a dry cloth if needed. This takes 90 seconds but prevents 70% of recurring gas grill won’t stay lit when dial is released issues. Track burner performance in a notes app—sudden changes signal emerging problems.
Seasonal Deep Clean Protocol
At season’s end, disconnect the gas line and remove all burner components. Soak thermocouples in white vinegar for 20 minutes to dissolve mineral deposits. Scrub burner tubes with a nylon brush, then blow out ports with canned air. Reassemble and perform a full leak test before winter storage. This 20-minute ritual extends thermocouple life by 3+ seasons.
When your gas grill won’t stay lit when dial is released, start with thermocouple cleaning and burner inspections—these fix 80% of cases under $5. If flames persist after releasing the knob following these steps, you’ve conquered the most common shutdown culprit. For persistent issues, professional thermocouple replacement remains the safest $50 investment for worry-free grilling. Remember: that frustrating flame-out is your grill’s way of protecting you. Respect the safety system, maintain it proactively, and never compromise on gas leak checks. Your perfectly seared steaks—and peace of mind—are worth the careful attention.