How a BBQ Smoker Works: Simple Guide
This post contains affiliate links. As an Amazon Associate, we earn from qualifying purchases.
You’ve fired up your smoker, watched the blue smoke curl around the chamber, and wondered: How does this metal box transform tough brisket into melt-in-your-mouth barbecue? Understanding how a BBQ smoker works isn’t just backyard trivia—it’s the key to avoiding dry, bitter meat and achieving that perfect smoke ring every time. Whether you’re wrestling with an offset firebox or programming a pellet hopper, this guide reveals the precise mechanics that turn raw protein into smoked perfection.
Mastering your smoker starts with recognizing it’s not just a fancy grill. It’s a controlled environment where heat, smoke, and time interact through specific physical principles. We’ll break down exactly how each component manipulates airflow and temperature to create restaurant-quality results at home—so you can troubleshoot problems before they ruin your cook and leverage pro techniques from day one.
The Flavor-Forming Chemistry Inside Your Smoker
Smoke isn’t just visible vapor—it’s a flavor delivery system packed with phenolic compounds that chemically bond with meat proteins. When wood burns below 650°F, it releases nitrogen dioxide that reacts with myoglobin near the meat’s surface, creating the signature pink smoke ring. Simultaneously, indirect heat at 225-275°F slowly converts tough collagen into gelatin without scorching the exterior.
Why temperature precision matters: Exceed 275°F and you’ll trigger rapid moisture loss through evaporation. Drop below 225°F and bacterial growth risks increase before the meat reaches safe internal temperatures. The water pan plays a dual role here—its evaporating moisture stabilizes chamber humidity while creating a thermal buffer that prevents surface drying during long cooks.
How Smoke Adhesion Creates Deep Flavor
Thin blue smoke—not thick white billows—is your flavor indicator. Thick smoke contains creosote that coats meat with bitter, acrid compounds. Achieve clean smoke by:
– Using seasoned hardwood (never green or resinous wood)
– Maintaining steady oxygen flow through dampers
– Avoiding smothered fires from excessive fuel
– Never soaking wood chips (water must evaporate before smoking begins)
6 Essential Components Every Smoker Relies On
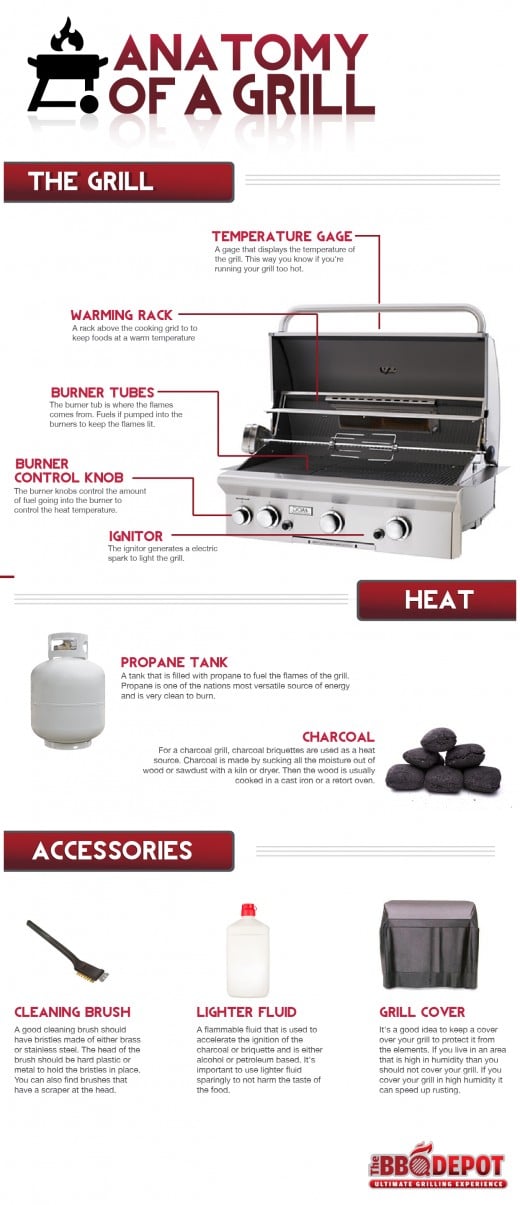
Your smoker functions as a closed ecosystem where these parts work in concert. Ignore any one element and temperature control becomes guesswork.
- Air intake damper (bottom vent): Controls oxygen supply to the fire—wider opening = hotter fire
- Fuel chamber: Where wood/charcoal burns to generate heat and smoke compounds
- Heat deflector/water pan: Shields food from direct flames while adding humidity
- Cooking chamber: Houses food in indirect heat zone with consistent airflow
- Exhaust damper (top vent): Manages smoke exit speed—critical for temperature fine-tuning
- Dual thermometers: Track both ambient chamber temperature and internal meat doneness
Pro tip: Calibrate thermometers annually using an ice bath (32°F) and boiling water (212°F at sea level). Most built-in smoker thermometers read 25-50°F high.
Pellet Smoker Automation Demystified
Pellet smokers deliver “set-and-forget” convenience through clever engineering. Hardwood pellets feed from the hopper into the burn pot via an electric auger. An igniter rod starts combustion, while a fan distributes heat evenly. Your digital controller adjusts auger speed based on real-time temperature feedback—maintaining your target within 5-10°F.
Why Pellet Smoke Differs From Traditional Smokers
Pellet burn temperatures stay remarkably consistent (typically 180-500°F), producing milder smoke than wood-fired units. For stronger flavor during long cooks:
– Add smoke tubes filled with wood pellets alongside your meat
– Use fruitwood blends (like apple-hickory) for complex notes
– Never run the hopper below 1/3 full—pellets can bridge and stop feeding
Charcoal Water Smoker Temperature Control Secrets
Vertical water smokers like the Weber Smokey Mountain use charcoal as their heat engine with a water pan creating critical separation between fire and food. Light 15-20 briquettes in a chimney starter, then pour them over unlit coals for extended burn time. The water pan acts as a heat sink—its evaporation stabilizes temperature swings while adding essential humidity.
Mastering the Damper Dance
Contrary to intuition, closing the top damper raises temperatures by increasing draft intensity through the firebox. Opening it cools the chamber by reducing airflow. Adjust in 1/8-inch increments:
– Too hot? Close bottom damper slightly OR open top damper
– Too cool? Open bottom damper OR close top damper
– Refill water pan with hot liquid every 2 hours (cold water causes temp drops)
Offset Smoker Heat Flow Hacks
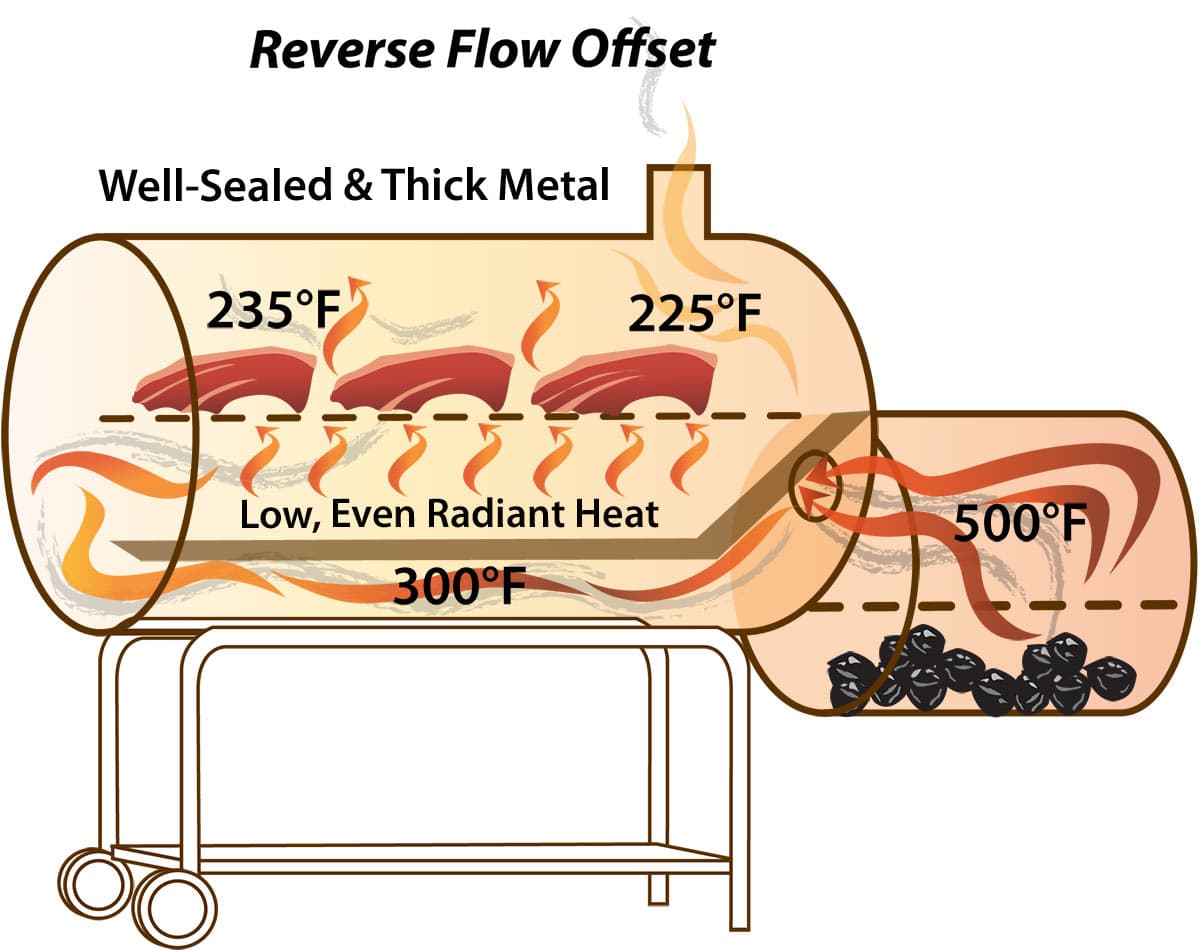
Traditional offset smokers create natural convection as heat travels horizontally from firebox to chimney. This design causes temperature gradients—food near the firebox cooks faster. Reverse-flow models solve this with a steel plate under the grates that forces smoke to travel the chamber twice before exiting.
Fire Management Without Constant Monitoring
Use the minion method for stable 12+ hour burns:
1. Fill firebox with unlit charcoal
2. Place 8-10 lit coals on top
3. Add wood chunks every 45 minutes
4. Position water pan on cooking grates near firebox to absorb excess heat
Critical mistake: Opening the cooking chamber more than twice per hour drops temperatures 50-100°F and releases precious smoke.
Kamado Grills: Ceramic Heat Retention Science
Kamado smokers like the Big Green Egg leverage 3-inch thick ceramic walls that absorb and radiate heat evenly. This thermal mass creates exceptional temperature stability—once preheated, they maintain target temps with minimal fuel adjustment. The tight gasket seal and precise daisy-wheel bottom vent allow control within 5°F increments.
Dual-zone versatility: Install the heat deflector (convEGGtor) for smoking, or remove it for 700°F searing. The ceramic construction makes them wind-resistant—ideal for year-round smoking where pellet smokers would struggle.
Wood Selection Guide: Matching Fuel to Meat
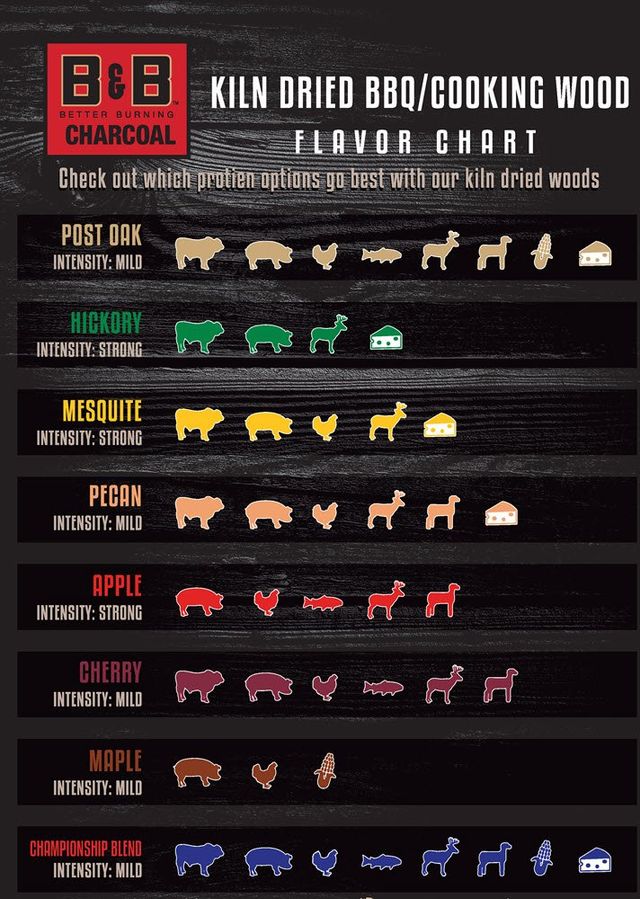
Your wood choice directly impacts flavor chemistry. Hardwoods contain different lignin compounds that break down into distinct aromatic molecules when burned.
| Wood Type | Flavor Chemistry | Best For | Avoid With |
|---|---|---|---|
| Hickory | High phenol content (bacon-like) | Pork shoulder, ribs | Delicate fish |
| Oak | Balanced aldehydes (medium smoke) | Brisket, game | Short cooks |
| Cherry | Fruity esters (sweet notes) | Chicken, salmon | Beef |
| Mesquite | Intense guaiacol (earthy punch) | Texas brisket | Anything <4 hrs |
Pro tip: Use wood chunks (not chips) for cooks over 2 hours—they smolder steadily without frequent reloading.
Step-by-Step Smoking Process for Reliable Results
Follow this universal workflow regardless of smoker type:
- Preheat with dry run: Burn at 250°F for 30 minutes to identify hot spots (use the “biscuit test”—place canned biscuits across grates)
- Stabilize temperature: Adjust dampers/auger until chamber holds steady 225°F for 15 minutes
- Add wood: Place 2-3 chunks directly on coals or in smoke tray
- Insert meat: Place on cooler side of indirect heat zone
- Monitor minimally: Check vents every 45 minutes; never peek more than twice per hour
- Finish & rest: Pull meat 5°F below target temp; wrap and rest 30+ minutes
Temperature Control Mastery in Windy or Cold Weather
Weather impacts every smoker differently. Combat challenges with these fixes:
- Wind: Position smoker with exhaust facing wind direction to prevent backdraft
- Cold (<40°F): Wrap offset/pellet smokers in welding blankets (never cover vents)
- Humidity: Open top damper slightly in rainy conditions to prevent steam buildup
- Pellet smokers: Use insulated hopper covers to prevent pellet moisture absorption
Key indicator: If smoke turns thick and white, immediately adjust airflow—this creosote-producing smoke will ruin your meat.
5 Costly Mistakes That Waste Your Time and Meat
Even experienced pitmasters fall for these traps:
- Peeking during the stall: When meat hits 150-170°F, evaporation cools the surface. Opening the lid disrupts this natural process, extending cook time by hours
- Ignoring ambient conditions: A 15mph wind can drop chamber temps 25°F—adjust dampers proactively
- Using unreliable thermometers: Dome thermometers often read 20°F high—always verify with a wireless probe
- Rushing the rest: Skipping the 30-minute rest causes 30% more juice loss when slicing
- Overloading wood: More smoke ≠ better flavor. Excess fuel creates acrid compounds that overpower meat
Beginner Success Strategy: Your First Smoke Roadmap
Start with forgiving cuts that hide minor temperature fluctuations:
- Pork shoulder: 12-14 hours at 225°F (target 203°F internal)
- Chicken thighs: 2.5 hours at 275°F (target 175°F)
- Chuck roast: 8 hours at 250°F (target 200°F)
Critical step: Journal every cook—record fuel amounts, weather, vent positions, and results. This data reveals your smoker’s unique personality for repeatable success.
Understanding how a BBQ smoker works transforms guesswork into precision. By leveraging the science of smoke adhesion, heat transfer, and moisture management, you’ll consistently produce competition-worthy barbecue. Remember: Great smoking isn’t about fancy equipment—it’s about mastering the relationship between fire, airflow, and time. Now fire up your smoker with confidence, knowing exactly what’s happening inside that metal chamber.