How an Electric Smoker Works: Simple Guide
This post contains affiliate links. As an Amazon Associate, we earn from qualifying purchases.
Imagine waking up to the smell of perfectly smoked brisket without spending all night tending a fire. Electric smokers deliver this convenience by replacing traditional fuel sources with precise electrical heating—yet understanding how these appliances actually function helps you achieve restaurant-quality results at home. Unlike their charcoal or wood counterparts, electric smokers use a sophisticated system where electricity, wood, and temperature control work together to transform ordinary ingredients into barbecue masterpieces.
This guide explains exactly what happens inside your electric smoker during a cook—from the moment you plug it in to when you pull out tender, flavorful meat. You’ll discover how the heating element creates consistent heat, how wood chips generate authentic smoke flavor, and why temperature control makes electric smokers perfect for beginners and busy schedules. Let’s demystify the technology that brings low-and-slow barbecue within anyone’s reach.
Electric Heat Replaces Traditional Fuel Sources
Your electric smoker eliminates charcoal and propane by using a high-resistance heating coil that converts electricity into reliable heat. This component, typically drawing 800-1200 watts, sits at the bottom of the unit and maintains steady temperatures between 100°F and 300°F—ideal for barbecue but too low for high-heat searing.
Unlike wood fires that fluctuate with wind and fuel quality, the electric heating element delivers consistent performance through precise electronic regulation. As you set your target temperature, internal sensors continuously monitor conditions and automatically adjust power to the heating element, creating the stable environment essential for tender barbecue.
Most electric smokers feature double-wall construction with insulation that traps heat efficiently. This design maintains temperature stability regardless of outdoor weather, allowing you to smoke meat successfully even during winter months when traditional smokers struggle.
Wood Chip System Generates Authentic Flavor
Electricity provides the heat, but real barbecue flavor comes from smoldering hardwood. Your smoker uses either a manual chip tray or automated pellet system to create smoke without open flames—delivering that distinctive barbecue taste without constant attention.
Manual Chip Tray Operation
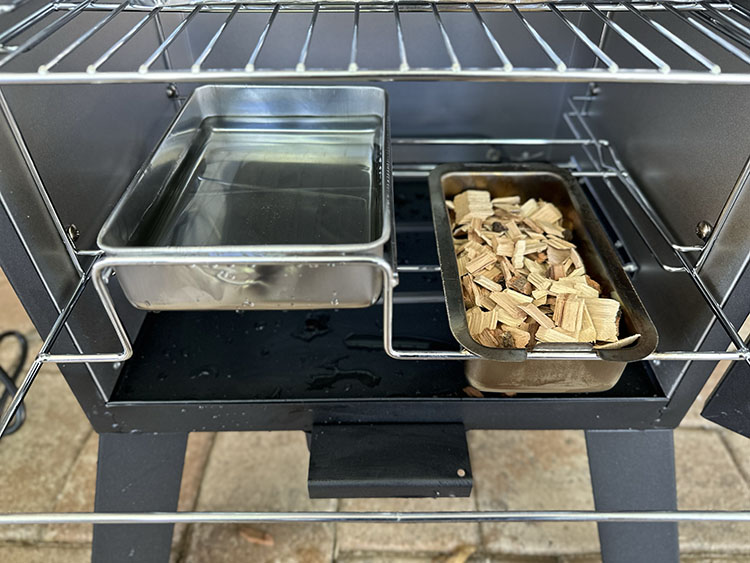
The chip tray sits directly above the heating element, holding 2-4 cups of hardwood pieces. As heat rises, it gradually brings your chips to smoldering point, releasing aromatic smoke that circulates through the chamber. Critical tip: Don’t overload the tray—2 cups maximum ensures proper airflow for clean smoke production.
Most chip trays require refilling every 3-5 hours during long cooks. Experiment with wood combinations—try hickory for bold flavor with apple wood for subtle sweetness—to create complex profiles that single wood varieties can’t achieve.
Pellet Hopper Automation
Premium models use an auger system that automatically feeds wood pellets from a large hopper. These systems hold 8-20 pounds of fuel—enough for 8-12 hours of continuous smoking. The electronic controller adjusts pellet delivery based on your smoke intensity preference, eliminating manual refilling while maintaining consistent flavor.
Temperature Control Works Automatically
Modern electric smokers eliminate guesswork through digital control panels that maintain precise temperatures throughout your cook. Set your target—typically 225°F for brisket or 250°F for pork shoulder—and the system handles the rest through continuous monitoring and adjustment.
How it works: A thermocouple inside the chamber measures temperature 20+ times per minute. When readings dip below your target, the controller sends more power to the heating element. When temperatures rise too high, power reduces automatically. This feedback loop maintains accuracy within 5-10°F—far more consistent than manual fire management.
The control system also manages timing functions, allowing you to program both temperature and duration. Set a 12-hour brisket cook and walk away—your smoker maintains conditions until time expires with no babysitting required.
Essential Components Inside Your Smoker
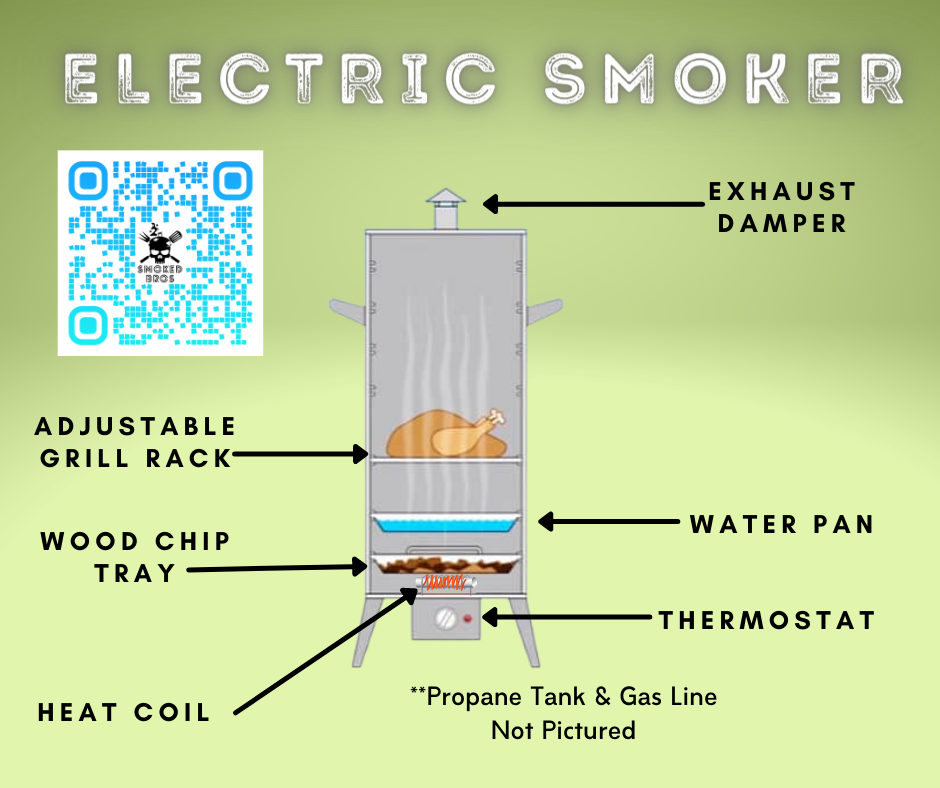
Heat Distribution System
A metal diffuser plate sits between the heating element and cooking racks, spreading heat evenly throughout the chamber. This component prevents hot spots that can burn food directly above the element while ensuring consistent cooking conditions across all rack levels.
Water Pan for Moisture Control
Positioned directly above the heat source, the water pan serves multiple critical functions:
– Creates steam that prevents meat surfaces from drying out
– Acts as a heat sink to stabilize temperature fluctuations
– Catches drippings for easier cleanup
– Adds humidity that helps smoke particles adhere to meat
Pro tip: Refill the water pan every 2-4 hours during extended cooks. Dry pans lead to tough bark and potential temperature spikes that ruin delicate meats.
Pre-Use Setup for Best Results
Initial Seasoning Process
New electric smokers require a break-in period called seasoning to burn off manufacturing residues. Coat interior surfaces with cooking oil, run empty at 250°F for 2-3 hours, then cool completely with the door open. Some newer models come pre-seasoned—always check manufacturer instructions first.
Pre-Cooking Checklist
Before each use:
– Empty and rinse the water pan
– Remove old wood chips from previous cooks
– Check electrical connections for damage
– Preheat to target temperature (15-30 minutes)
– Add fresh wood chips when temperature stabilizes
Step-by-Step Smoking Process
Food Placement Strategy
Place heavier items on lower racks where heat concentrates. Position meat fat-side-up to allow self-basting during cooking. Leave 1-2 inches between items for proper smoke circulation—crowded racks create uneven cooking and poor smoke penetration.
Temperature and Time Guidelines
- Poultry: 250°F until internal temperature reaches 165°F (typically 2-4 hours)
- Pork shoulder: 225-250°F for 12-16 hours (internal temp 195-205°F)
- Beef brisket: 225-250°F for 12-18 hours (internal temp 195-205°F)
- Fish: 200-225°F for 1-3 hours (internal temp 145°F)
Important: Most meats only need smoke for the first 3-4 hours—additional smoke creates bitter flavors rather than enhancing taste. Check wood chip levels every 2-3 hours and replace as needed.
Maintenance Keeps Performance High
Post-Cooking Cleaning Protocol
- Remove racks, water pan, and chip tray while still warm (not hot)
- Scrape large debris with a plastic scraper
- Wash removable parts with warm, soapy water
- Wipe interior surfaces with damp cloth
- Leave door open for complete drying
Warning: Never use harsh chemicals or pressure washers—these can damage heating elements and electronic components. Perform thorough cleaning every 3-5 uses to prevent grease buildup.
Performance Advantages and Limitations
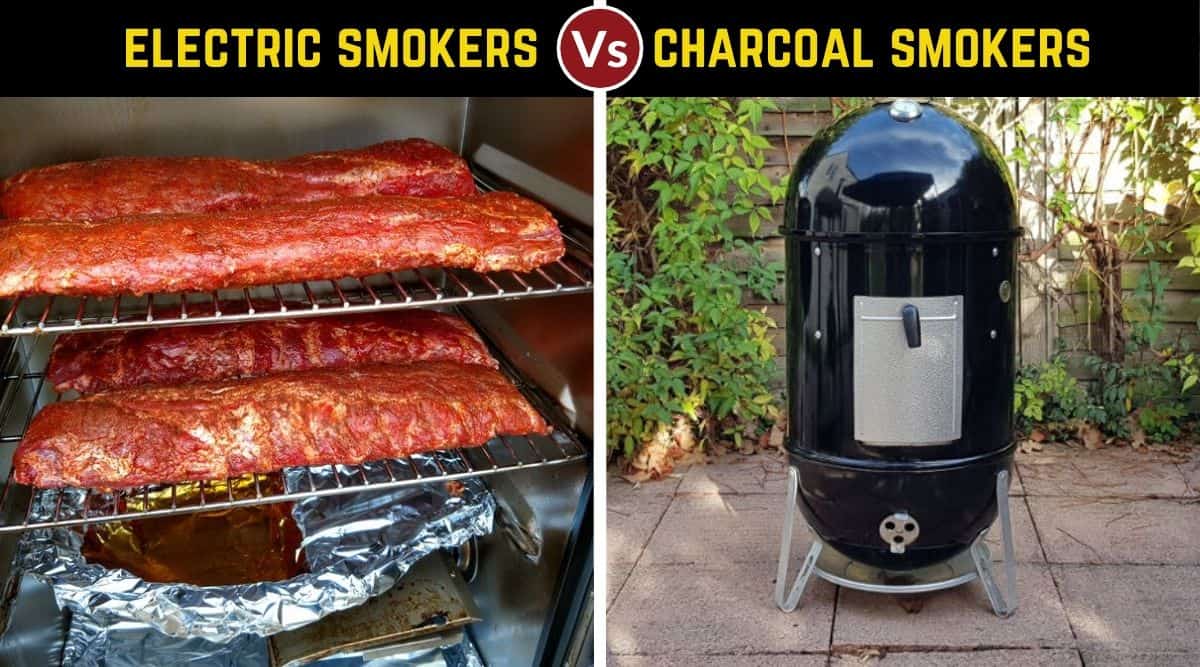
Why Choose Electric
Electric smokers deliver consistent results through precise temperature control, eliminating the learning curve of managing charcoal fires. Energy efficiency surprises many users—an 8-hour cook typically costs $0.50-$1.50 in electricity, far less than equivalent charcoal usage. The “set it and forget it” operation allows smoking overnight without hourly adjustments.
Key Limitations
The 300°F temperature ceiling prevents high-heat applications like grilling or searing. Smoke flavor tends to be milder than traditional offset smokers, though this appeals to many palates. Most importantly, you’ll need reliable electrical access—outdoor extension cords can create safety hazards and performance issues.
Troubleshooting Common Problems
No Smoke Production
- Verify chip tray isn’t overloaded (2 cups maximum)
- Check tray positioning directly above heating element
- Replace old or damp wood chips
- Ensure vents aren’t completely closed
Temperature Swings
- Inspect door gasket for gaps or wear
- Clean heating element monthly to prevent buildup
- Avoid opening door frequently during cooks
- Check for obstructions in vent areas
Wood Selection Guide
Best Wood Types by Meat
- Apple/Cherry: Perfect for poultry and pork, adds subtle sweetness
- Hickory: Classic barbecue flavor for beef and ribs
- Oak: Strong but not overpowering, excellent for brisket
- Pecan: Nutty flavor that complements most meats
- Mesquite: Bold, earthy flavor—use sparingly on delicate proteins
Soak chips for 30 minutes before use to extend smoldering time. Mix wood types—try 2 parts oak to 1 part fruit wood for balanced flavor. Store wood in sealed containers to prevent moisture absorption.
Safety Essentials
Always use GFCI-protected circuits for outdoor operation. Keep connections dry and elevated off the ground. Inspect cords for damage before each use—frayed wires create fire hazards. Maintain 3-foot clearance from combustible materials and use heat-resistant gloves when handling hot components.
Understanding how your electric smoker works—from the heating element that replaces charcoal to the chip tray that creates smoke—helps you troubleshoot issues and optimize results. Focus on quality ingredients, proper seasoning, and patient cooking times. The technology handles the rest, delivering consistent barbecue results through precise temperature control and automated systems. Start with forgiving cuts like pork shoulder while you learn your smoker’s personality, and within a few cooks, you’ll master low-and-slow barbecue without constant attention.