How Grill Pans Work: Searing Made Easy
This post contains affiliate links. As an Amazon Associate, we earn from qualifying purchases.
That sizzle when your steak hits the ridges. Those perfect black stripes that make your Instagram food photos pop. But why does a simple pan transform your stovetop into an indoor grill? Understanding how grill pans work reveals why your indoor sear looks authentic but tastes different from backyard barbecue. The secret lies in physics you can see in the steam rising from those valleys between ridges. Get ready to unlock restaurant-quality results while knowing exactly what flavor trade-offs to expect.
Grill Pan Ridge Engineering Explained
Grill pans transform ordinary burners through precisely engineered ridges that create intense conductive heat zones. These elevated strips lift food above pooled fat while valleys channel away steam that would otherwise cool the cooking surface. Unlike flat pans, this topography creates dramatic temperature differentials essential for authentic searing.
Why Ridge Height Determines Sear Quality
Ridges exceeding 1/4 inch (0.6 cm) create restaurant-style char lines by maximizing food elevation. This critical height prevents proteins from simmering in rendered fat, maintaining surface temperatures above 400°F needed for proper browning. Shorter ridges produce faint marks and inconsistent results since food remains partially submerged in cooling juices. For thick steaks, taller ridges also reduce flare-up risks by keeping fat reservoirs farther from heat sources.
Valley Spacing’s Steam Management Role
The space between ridges isn’t just empty real estate—it’s a thermal escape route. Wide valleys (at least 3/8 inch) allow water vapor from cooking proteins to rapidly evacuate. Without this drainage, accumulated steam would lower pan temperature by 50-75°F, turning searing into steaming. This spacing also creates dedicated fat-collecting reservoirs, preventing reabsorption of impurities while maintaining consistent contact heat on the ridges.
Physics Behind the Perfect Sear Marks
Grill pans deploy three heat transfer methods simultaneously, but conduction dominates the searing process. The ridges function as thermal accelerators, concentrating burner energy into narrow contact points where temperatures soar 200°F hotter than adjacent valleys.
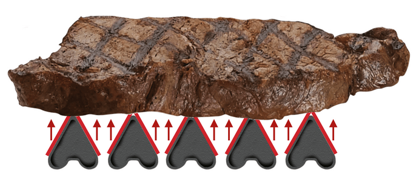
How Ridges Create Visual Grill Marks
When meat touches the ridges, surface proteins denature within seconds at these intense hotspots. This rapid Maillard reaction creates the signature dark stripes while areas between ridges remain comparatively pale. The temperature differential is so pronounced that ridges can reach 450°F while valleys stay near 250°F—explaining why only 30-40% of your food surface develops deep browning compared to 70% on outdoor grills.
Why Grill Pans Can’t Replicate Outdoor Flavors
Radiant heat from valleys remains weak compared to charcoal’s intense infrared output. Hold your hand 3 inches above a hot grill pan—you’ll feel minimal warmth versus the instant burn risk over live coals. This explains the flavor gap: without strong radiation and flame contact, vaporized fat compounds never develop. Plus, pooled fat in valleys merely simmers instead of creating flavor-enhancing flare-ups.
Material Science Comparison
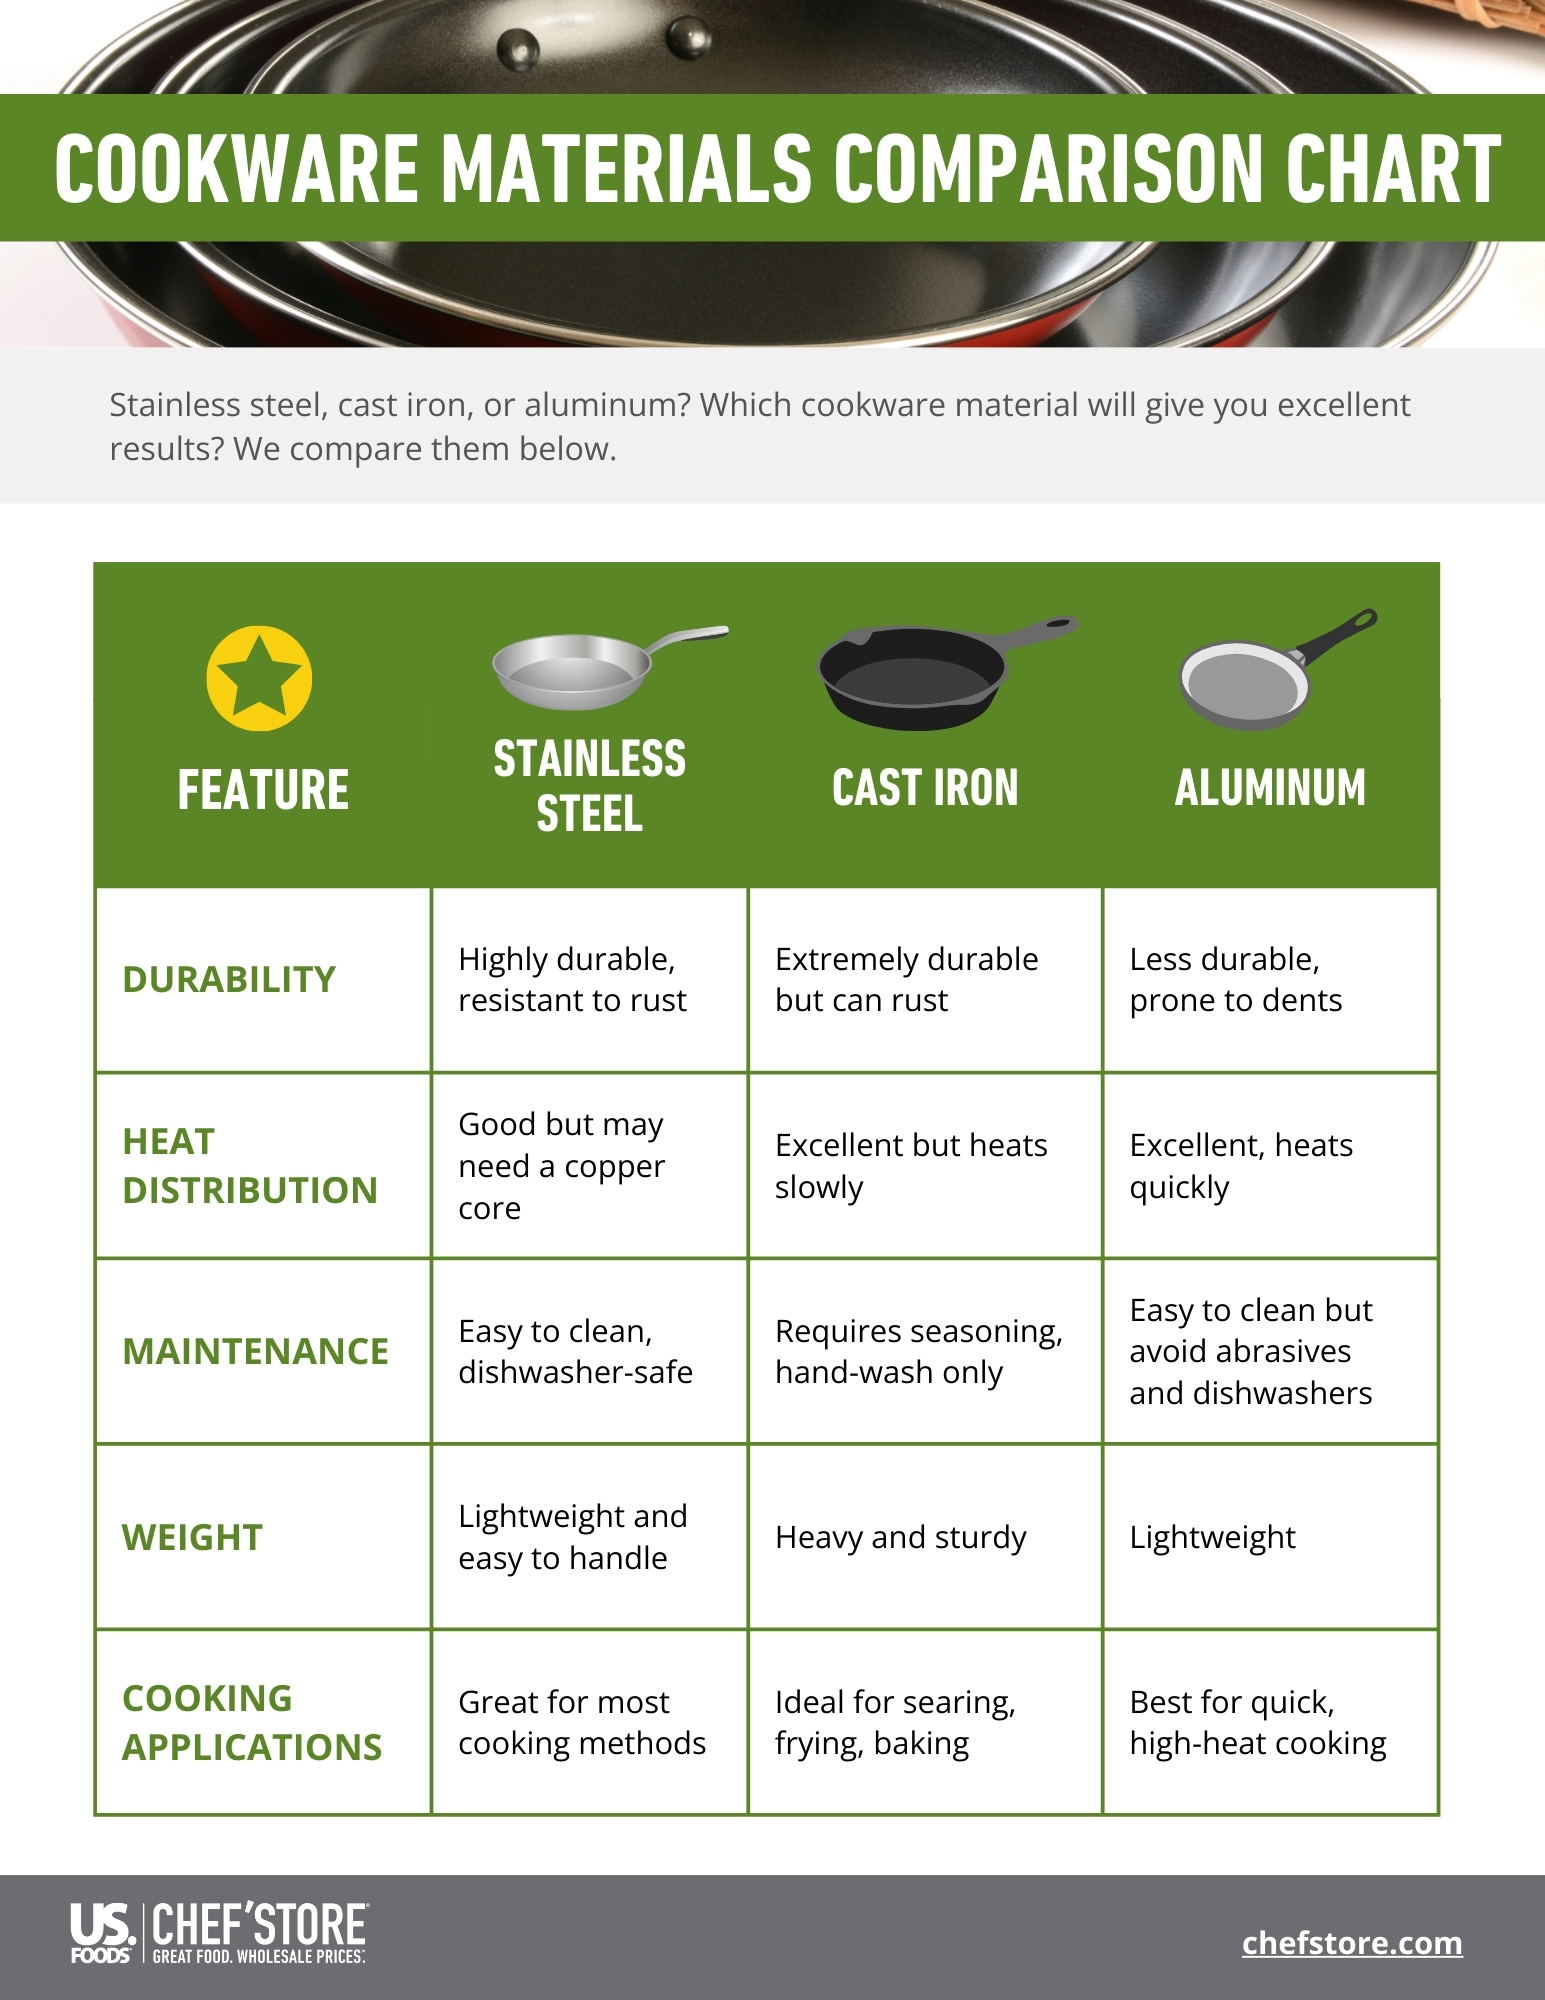
| Material | Heat Retention | Mark Depth | Best For | Critical Limitation |
|---|---|---|---|---|
| Bare Cast Iron | ★★★★★ | Deep, crisp | Steaks, burgers | Requires seasoning maintenance |
| Enameled Cast Iron | ★★★★★ | Deep, crisp | Fish, chicken | Avoid metal utensils |
| Heavy Aluminum | ★★★☆☆ | Moderate | Vegetables | Nonstick coating degrades above 450°F |
| Stainless Steel | ★★★☆☆ | Light | Chicken breasts | High oil usage needed |
| Nonstick | ★★☆☆☆ | Faint | Delicate foods | Can’t achieve true searing temps |
Cast Iron’s Thermal Dominance
Bare cast iron’s superior heat retention maintains searing temperatures even when cold proteins hit the surface. This thermal mass creates consistent, deep grill marks but demands regular seasoning. Skip this maintenance, and rust will compromise performance within weeks. For best results, heat cast iron 2 minutes longer than other materials before adding food.
Nonstick Grill Pan Reality Check
Nonstick coatings fundamentally limit searing potential. Most degrade above 450°F—precisely the temperature needed for optimal crust development. While convenient for eggs or delicate fish, these pans produce pale, inconsistent marks. If you prioritize visual appeal, choose seasoned cast iron or stainless steel instead.
Foolproof Indoor Grilling Technique
Pre-Heating Protocol (Non-Negotiable)
Heat your pan over medium-high for 5-7 minutes until water droplets instantly skitter and vanish. Underheated pans cause proteins to stick and steam instead of sear. Test with a single drop—if it dances for 2+ seconds, keep heating. This step takes 30% longer for cast iron but prevents disastrous sticking.
Food Preparation Secrets
Pat proteins bone-dry with paper towels—any surface moisture creates steam barriers. Season generously, then lightly oil the food (not the pan) using avocado or refined peanut oil. Place items perpendicular to ridges for classic straight-line marks, leaving ½-inch gaps between pieces. Overcrowding drops pan temperature by 100°F+ in seconds.
The 90-Second Sear Rule
Resist moving food for 90 seconds to set initial marks. For crosshatch patterns, rotate 90 degrees before flipping. Flip only when deep browning appears—premature flipping tears proteins. Use an instant-read thermometer: pull steaks at 125°F for medium-rare since carryover cooking adds 5-10°F after removal.
Flavor Reality: What Grill Pans Can and Can’t Do
Grill pans deliver visual authenticity but hit a hard flavor ceiling. The absence of radiant heat and flame contact means no smoky compounds from vaporized fats. Expect steak with perfect marks but missing that complex, charred depth only live fire provides. However, proper technique yields impressive crust development through concentrated Maillard reactions on ridge contact points.
Managing Indoor Smoke Wisely
Preheating cast iron often triggers smoke alarms—this is normal. Disable detectors temporarily and open windows before cooking. For flare-ups, keep a spray bottle of water nearby but use sparingly; excessive misting cools ridges and ruins searing. Never add water directly to smoking oil—this causes dangerous splatters.
Maintenance That Preserves Performance
Post-Cook Cleaning Window
Clean while warm (not hot) within 10 minutes of cooking. Pour ½ inch of hot water into valleys to loosen residue, then scrub with a damp cloth wrapped around tongs. Immediate cleaning prevents carbonized buildup that requires harsh scrubbing later. Never soak cast iron—this invites rust.
Cast Iron Seasoning Protocol
For stubborn residue, scrub with coarse salt and oil-dampened paper towels. After thorough drying, apply micro-thin oil layer and bake 1 hour at 375°F. This polymerizes oil into nonstick surface. Properly maintained cast iron actually improves with age, unlike nonstick pans that degrade after 2-3 years.
Practical Limitations You Must Know
Thin aluminum pans create uneven hot spots leading to spotty marks—test with oil droplets before cooking. While ridges elevate food, accumulated fat in valleys can re-burn during long cooks; pour off excess every 3-4 minutes. Square grill pans also demand 30% more cabinet space than round skillets, complicating storage.
Best Foods for Grill Pan Success
Red Meat Mastery
Steaks and burgers thrive on cast iron grill pans. The intense ridge contact creates crispy crusts while valleys drain excess fat. For cuts thicker than 1.5 inches, sear 90 seconds per side then finish in a 400°F oven to prevent over-charred exteriors with raw centers.
Poultry Perfection Strategy
Skin-on chicken breasts develop crackling skin when pressed firmly against ridges. Bone-in pieces require starting skin-side down for 3 minutes before flipping, then covering with a lid to steam-cook through without burning. Never overcrowd—this causes steaming that ruins crispness.
Vegetable Caramelization Hacks
Slice zucchini, bell peppers, and asparagus into uniform ½-inch planks. Toss in high-smoke-point oil and grill over medium-high heat 3-4 minutes per side. The ridges create dramatic char lines while maintaining crisp-tender interiors—impossible in flat pans where vegetables steam in their own juices.
Pro Searing Shortcuts
Temperature Control: Keep surface between 400-450°F using an infrared thermometer. Below 375°F causes sticking; above 500°F burns oils before browning occurs.
Press Power: Place a foil-wrapped brick on thick chicken breasts for full ridge contact—doubles crust development speed.
Timing Precision: Flip only when marks release cleanly. If food resists lifting, wait 15 seconds more—premature flipping tears proteins and ruins presentation.
Grill pans work by transforming stovetop heat into concentrated conductive energy through strategically engineered ridges. This physics creates authentic-looking sear marks while managing fat and steam through valley drainage. But remember: they simulate visual grilling, not flavor replication. True barbecue complexity requires open flames and smoke infusion that indoor cookware can’t provide. Master the preheating ritual, choose cast iron for serious searing, and respect the 90-second rule. Your indoor grilling will consistently deliver impressive crusts and professional presentation—just don’t expect the same smoky soul as your backyard grill. For best results, pair your pan with high-quality proteins and realistic expectations about its delicious limitations.