How Grill Vents Work: A Simple Guide
This post contains affiliate links. As an Amazon Associate, we earn from qualifying purchases.
Your steak is burning on the outside while remaining raw inside. Sound familiar? The culprit isn’t your grilling skills—it’s likely your vent settings. Mastering how do grill vents work transforms inconsistent grilling into precise temperature control, whether you’re searing burgers at 450°F or smoking brisket low and slow. Understanding this critical system puts you in complete command of your cooking environment.
Grill vents aren’t just holes in metal—they’re precision instruments that regulate oxygen flow to your fuel. By understanding this relationship, you’ll gain complete control over heat intensity, cooking speed, and smoke flavor development. Most backyard grillers never realize that vent positioning is the single most important factor in achieving perfect results, not the amount of charcoal or cooking time.
Bottom Vents: Your Grill’s Oxygen Control Center
Your grill’s bottom vents serve as the primary oxygen intake system, directly determining how hot your fire burns. Located beneath the charcoal grate, these vents pull fresh air straight to your burning fuel. The adjustment scale is straightforward but powerful:
Fully open: Maximum oxygen creates the hottest possible fire—perfect for searing steaks
50% open: Moderate heat for standard grilling
25% open: Low heat for delicate foods or extended cooking
Fully closed: Cuts oxygen completely, extinguishing the fire
Weber kettle grills feature three individual bottom vents, allowing precise zone control. You can open vents directly under your coals while keeping others closed, creating distinct heat zones within the same grill. This configuration is essential for implementing the two-zone cooking method that separates direct and indirect heat areas.
How Bottom Vents Affect Cooking Results
When bottom vents remain too open during low-and-slow smoking, your charcoal burns too quickly, creating excessive heat that dries out meats. Conversely, closing them too much causes incomplete combustion, producing bitter-tasting smoke that ruins your food’s flavor. The sweet spot for smoking lies between 20-30% open, maintaining that perfect blue smoke rather than thick white plumes.
Top Exhaust Vents: The Draft Driver You’re Probably Misusing
Top vents, positioned on the grill lid, work as your exhaust system but have a more critical role than many realize. While they allow heat and smoke to escape, their primary function is creating draft—the force that pulls fresh air through bottom vents. This creates the airflow system that sustains your fire.
Why You Should Keep Top Vents Fully Open
Most experts recommend keeping top vents fully open and using bottom vents for primary control. Here’s why: closing top vents restricts the entire airflow system, potentially extinguishing your fire even with open bottom vents. The only exception? When you need dramatic temperature reduction quickly.
When top vents remain partially closed during normal operation, you create negative pressure that starves your fire of oxygen. This results in inconsistent temperatures, increased smoke production, and frustrating cooking results. For reliable temperature control, make your bottom vents the primary adjustment point while keeping top vents open.
Three Proven Vent Configurations for Perfect Cooking
High-Heat Searing Setup (450-550°F)
For direct grilling and searing:
– Open all bottom vents fully
– Keep top vents wide open
– Remove the lid for thin cuts like smash burgers
– Add fresh charcoal as needed—open vents accelerate ignition
This configuration creates maximum oxygen flow, generating intense heat for rapid surface searing and quick cooking of thin foods. The fully open vents ensure your charcoal reaches peak temperatures in under 15 minutes after initial lighting.
Moderate Heat Setup (350-450°F)
Standard grilling temperature for most foods:
– Adjust bottom vents to 50% open
– Maintain top vents fully open
– Keep the lid on for thicker cuts
– Monitor temperature for 10 minutes after each adjustment
This balance provides steady heat for bone-in chicken, vegetables, and most everyday grilling tasks. The partially restricted airflow prevents flare-ups while maintaining consistent cooking temperatures across the entire cooking surface.
Low-and-Slow Smoking Setup (225-275°F)
For authentic barbecue results:
– Close bottom vents to 25% open
– Keep top vents fully open
– Always cook with the lid on
– Use the two-zone fire method for smaller cuts
This restricted airflow creates lower temperatures ideal for smoking ribs, brisket, or pulled pork. The minimal oxygen supply ensures your charcoal burns slowly and steadily for 8-12 hours without needing additional fuel.
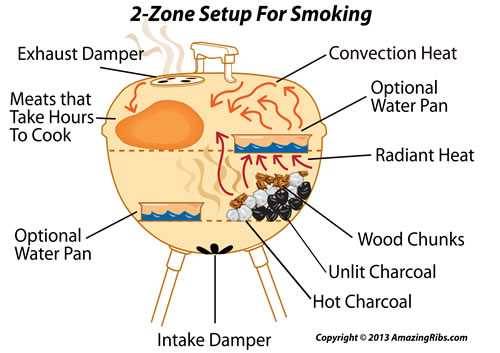
Two-Zone Fire Configuration for Maximum Control

Creating separate heat zones revolutionizes your grilling capability. Here’s the proven setup for charcoal grills:
Hot Zone Setup:
– Pile coals on one side with bottom vents directly beneath fully open
– Add wood chunks for smoke generation
– Target temperature: 250-275°F above the coals
Cool Zone Setup:
– Leave opposite side coal-free
– Place water pan underneath for temperature stability
– Position meat here with bottom vents 25% open
– Align top vent over meat side to direct smoke flow
This arrangement creates natural convection currents that pull smoke across your food while maintaining gentle cooking temperatures. When flipping meats, simply move them between zones instead of physically turning them, preserving valuable juices.
Critical Vent Adjustment Procedures
Initial Lighting Protocol
Always start with all vents fully open. Maximum airflow accelerates charcoal ignition and establishes your fire quickly. Once coals ash over (typically 15-20 minutes), begin adjusting vents to reach target temperature. Skipping this step creates frustratingly long startup times and inconsistent initial heat.
Temperature Adjustment Method
Never make dramatic vent changes. Instead:
1. Adjust bottom vents in 25% increments
2. Wait 10-15 minutes between changes
3. Monitor temperature with a reliable thermometer
4. Keep a log of vent positions for future reference
Remember: charcoal responds slowly to vent adjustments. Patience prevents temperature overshooting and failed cookouts. Rushing this process causes the most common grilling failures.
Wind and Weather Adaptation
External conditions significantly impact vent performance:
Windy conditions:
– Partially close vents facing wind direction
– Use a windscreen or position grill strategically
– Expect faster fuel consumption
Calm conditions:
– Vents may need to remain more open
– Temperature control becomes easier
– Use a chimney starter for consistent ignition
Troubleshooting Common Vent Problems
:max_bytes(150000):strip_icc()/__opt__aboutcom__coeus__resources__content_migration__serious_eats__seriouseats.com__images__20100426-grill-temp-large-47163a51f978423da8311b1318eb75a0.jpg)
Grill Won’t Reach Target Temperature
When your grill won’t get hot enough:
– Clean ash from bottom vents (common issue!)
– Ensure adequate charcoal quantity (at least 1/3 full chimney)
– Check for obstructions in vent pathways
– Verify lid seals properly with no major gaps
This problem usually stems from restricted airflow rather than insufficient fuel. Most grillers add more charcoal when they should actually be opening vents wider.
Temperature Runs Too Hot
When your grill overheats:
– Close bottom vents gradually in small increments
– Avoid opening lid frequently (causes oxygen surges)
– Use water pan for thermal mass to stabilize temperatures
– Switch to indirect cooking method immediately
This common issue often occurs when grillers open vents too wide initially then panic and slam them shut, causing wild temperature swings.
Advanced Vent Mastery Techniques
Fine-Tuning Temperature Precision
For exact temperature control with your specific grill:
1. Start with all vents fully open
2. Target temperature 50°F above desired cooking temp
3. Gradually close bottom vents in 10% increments
4. Allow 5-minute stabilization between adjustments
5. Use top vent only for emergency temperature drops
This systematic approach eliminates guesswork and creates repeatable results. Your grill’s unique airflow characteristics will become familiar within just 2-3 cooking sessions.
Charcoal Type Considerations
Different fuels require different vent strategies:
Lump charcoal:
– Burns hotter and faster
– Requires more vent restriction
– Responds quickly to adjustments
– Ideal for high-heat searing
Briquettes:
– Burn more consistently
– Need more open vent settings for equivalent heat
– Provide longer, steadier cooking times
– Better for extended smoking sessions
Understanding how do grill vents work with your specific fuel type prevents common temperature control mistakes that ruin otherwise perfect cookouts.
Mastering grill vents transforms you from frustrated griller to confident pitmaster in just a few cooking sessions. Remember: open vents equal hot fire, closed vents equal cool fire. Start with these fundamentals, then experiment with your specific grill and cooking style. Your perfectly cooked steaks, fall-off-the-bone ribs, and juicy burgers will thank you—no more guessing games or ruined meals when you finally understand how do grill vents work. Keep this guide handy for your next cookout and watch your grilling success rate skyrocket.