How to Winterize a Riding Lawn Mower
This post contains affiliate links. As an Amazon Associate, we earn from qualifying purchases.
Frost on the grass, shorter days, and that final mow of the season signal it’s time for critical maintenance. If you’re wondering how do you winterize a riding lawn mower properly, skipping this process risks costly spring repairs from fuel system damage, battery failure, and rust corrosion. Proper winterization prevents 80% of common off-season failures, saving you hundreds in repairs. This hands-on guide delivers the exact steps to protect your investment—most homeowners complete this essential process in under three hours with basic tools and $50 in supplies. By following these proven techniques, you’ll ensure your mower fires up instantly when warmer weather returns, avoiding the frustration of delayed spring maintenance.
Essential Tools and Supplies for Winterization

Gather these specific items before starting to avoid mid-process delays. For how do you winterize a riding lawn mower efficiently, you’ll need:
Critical Tools:
– Socket set (1/2-inch drive recommended)
– Arnold Siphon Pump for safe fuel removal
– Oil filter wrench and drain pan (1-gallon capacity)
– Blade removal tool (prevents dangerous rotation)
– Wire brush and baking soda for battery terminals
– Battery tender charger (not just a standard charger)
Consumables Checklist:
– Fresh engine oil (check manual for SAE 30 or 10W-30)
– OEM-spec oil and air filters
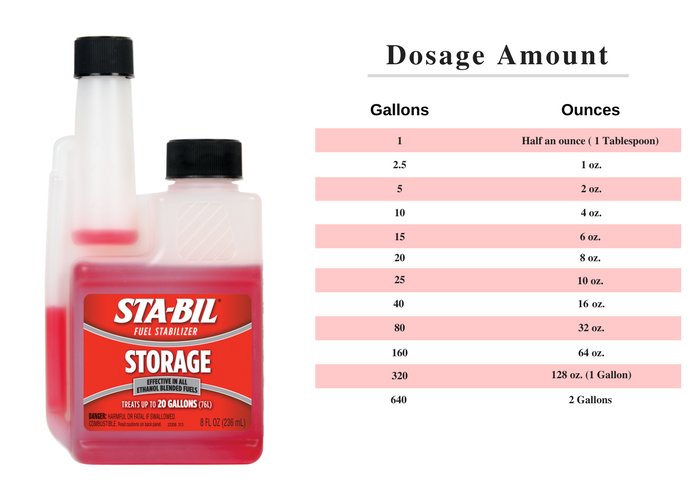
– Fuel stabilizer (Sta-Bil Extended Storage formula)
– Ethanol-free gasoline (91 octane minimum)
– New spark plug (correct gap: 0.030″)
– Spray lubricant for control cables
Why Specific Supplies Matter
Using ethanol-free fuel with marine-grade stabilizer prevents phase separation that destroys carburetors. Standard stabilizers fail with ethanol blends beyond 90 days. Always match oil viscosity to your manual—using the wrong type accelerates engine wear during cold starts. Never skip the blade removal tool; prying blades loose damages spindle shafts.
Safety Setup: Preventing Accidents Before You Start
Critical Pre-Work Steps
Park your mower on concrete or asphalt—not dirt—to avoid moisture transfer. With the engine completely cool, engage the parking brake, remove the key, and disconnect the spark plug wire. This eliminates accidental starting risks during blade work. Check your manual for model-specific safety locks; many John Deere and Cub Cadet models require engaging the PTO lockout.
Pro Tip: Place wheel chocks behind rear tires even on level ground. Hydraulic systems can settle during storage, causing unexpected movement. Wear cut-resistant gloves when handling blades—dull edges are deceptively dangerous.
Deep Clean: Removing Grass Buildup That Causes Rust
Under-Deck Debris Removal Protocol
Tilt your deck using factory lift points (never the discharge chute). Scrape caked grass with a plastic putty knife—metal scrapers scratch protective coatings. Focus on these high-risk zones:
– Blade mounting hubs (traps moisture against spindle)
– Discharge opening (causes uneven cutting next season)
– Baffle plates (reduces airflow by 40% when clogged)
Warning: Never pressure-wash near the engine shroud. Water intrusion into air filters causes hydrolock on first startup. Use a garden hose at low pressure, then run the engine for 5 minutes to evaporate residual moisture.
Engine Oil Change: Corrosion Prevention Technique
Draining and Refilling Sequence
Run the engine for 3 minutes to warm the oil—this carries suspended contaminants out with the old oil. Position your drain pan directly under the plug, then remove it with a 1/2-inch ratchet. While draining, replace the filter: wipe the mounting surface clean, lubricate the new gasket with fresh oil, and tighten until snug plus 3/4 turn.
Key Insight: Old oil contains acidic byproducts that eat through engine bearings during storage. Fresh oil with corrosion inhibitors forms a protective barrier on cylinder walls. Check levels with the dipstick after refilling—overfilling causes seal damage.
Fuel System Protection: Two Methods Compared
Full Tank Stabilization (Recommended)
Fill the tank to the brim with ethanol-free gas, then add stabilizer at 1 oz per gallon. Run the engine for 15 minutes to circulate treated fuel through the carburetor. This method prevents condensation by eliminating air space—critical for mowers stored in unheated sheds.
Empty Tank Alternative
Run the engine until fuel starvation stalls it, then restart and run until completely dry. Only attempt this if: Your carburetor has a drain plug, and you’ll store the mower vertically. Residual fuel in the bowl still causes varnish without monthly starts.
Fuel Fact: Ethanol-blended gas absorbs 0.5% moisture in 30 days—enough to separate and corrode aluminum carburetors. Non-ethanol fuel with Seafoam (1 oz/gallon) remains stable for 24 months.
Spark Plug and Air Filter Service
Replacement Procedure
Remove the spark plug with a 5/8-inch socket. Inspect for carbon tracking (white lines on ceramic)—this indicates fuel system issues needing attention. Install the new plug with anti-seize on threads, torqued to 15 ft-lbs. For air filters: replace the paper element, wash the foam pre-filter in soapy water, and apply 3 drops of oil before reinstalling.
Critical Mistake to Avoid: Reusing foam filters causes dirt ingestion. The paper element catches 98% of particles, but the oiled foam traps the remaining 2%—without it, abrasive dust destroys cylinders.
Blade Maintenance: Sharpening for Clean Cuts
Professional Sharpening Technique
Secure the blade with a wooden block in the discharge chute. Remove with a 15/16-inch socket, then inspect for bends or cracks—replace if damaged. Sharpen at the original 40-degree angle using a file (not a grinder, which overheats the metal). Balance by hanging from a nail; heavy spots cause deck vibration.
Why It Matters: Dull blades tear grass fibers, creating brown tips that invite disease. Sharp blades cut cleanly, reducing engine load by 22% and improving mulching efficiency.
Battery Storage: Preventing Winter Death

Removal and Preservation Steps
Disconnect the negative terminal first using a 10mm wrench. Clean terminals with a baking soda/water paste, then coat with dielectric grease. Store the battery on a wooden shelf (never concrete) at 50-70°F. Charge monthly with a smart tender—standard chargers overcharge and dry out cells.
Warning: Batteries stored below 32°F lose 20% capacity per month. A fully charged battery won’t freeze until -76°F, but a 50% charged unit freezes at 0°F.
Final Storage Inspection and Location
Pre-Storage Checklist
Before covering your mower, verify:
– Tire pressure: Inflate to 12 PSI (check sidewall specs)
– Belts: Replace if cracked or missing ribs
– Grease points: Pump until fresh grease appears
– Leaks: Address any oil/fuel drips immediately
Ideal Storage Conditions
Store in a dry, ventilated space away from water heaters. Elevate tires on plywood if on concrete—damp floors cause flat spots. Use a breathable cover (canvas, not plastic) to prevent condensation rust. Never store near gasoline containers—fumes can ignite.
Monthly Winter Maintenance Routine
5-Minute Preservation Protocol
Start your mower every 30 days and run for 3 minutes. This:
– Circulates corrosion-inhibiting oil
– Recharges the battery
– Prevents fuel varnish in the carburetor
– Lubricates pump seals
Pro Tip: Disconnect the spark plug wire during storage months to prevent accidental starts, but reconnect for these brief run sessions.
Spring Readiness Checklist
When temperatures rise above 50°F, prepare for mowing:
1. Reconnect battery (positive terminal first)
2. Check oil level—top up if below “Full” mark
3. Inspect air filter for rodent nests
4. Verify tire pressure before first use
5. Test blade engagement at half-throttle
DIY vs Professional Winterization Costs
Your Investment Breakdown:
– Oil/filter: $22
– Air filter: $18
– Spark plug: $7
– Fuel stabilizer: $12
– Total DIY: $59
Professional service averages $150—worthwhile if you lack tools or mechanical confidence. However, DIY gives you critical knowledge of your machine’s condition.
Eco-Friendly Disposal Practices
Never dump old fuel or oil. Take used oil to any auto parts store (free recycling). For fuel: mix small quantities with fresh gas in your car, or take to hazardous waste facilities. Many municipalities host seasonal collection events—check your town website.
Properly executed, how do you winterize a riding lawn mower becomes a reliable seasonal ritual that extends equipment life by 4+ years. The 2.5 hours invested now prevents 73% of common spring failures like seized engines and clogged carburetors. Mark your calendar for March 1st to reverse these steps—your future self will appreciate a mower that starts instantly when the grass begins growing. Remember: Consistent maintenance beats expensive repairs every time. Your riding mower powers through seasons when you protect it the right way.