How Infrared Grills Work: Quick Guide
This post contains affiliate links. As an Amazon Associate, we earn from qualifying purchases.
Ever struggle with dry, overcooked steaks while restaurants achieve perfect crusts with juicy interiors? The secret weapon is infrared grilling technology—a game-changer that delivers professional results in your backyard. Unlike conventional grills that dry out food through hot air circulation, infrared systems use electromagnetic radiation to transfer heat directly to your food’s surface. Understanding how does an infrared grill work unlocks faster searing, 35% better moisture retention, and virtually flare-up-free cooking. This guide reveals the exact mechanics from ignition to that first perfect bite.
Why Infrared Heat Beats Traditional Convection Cooking
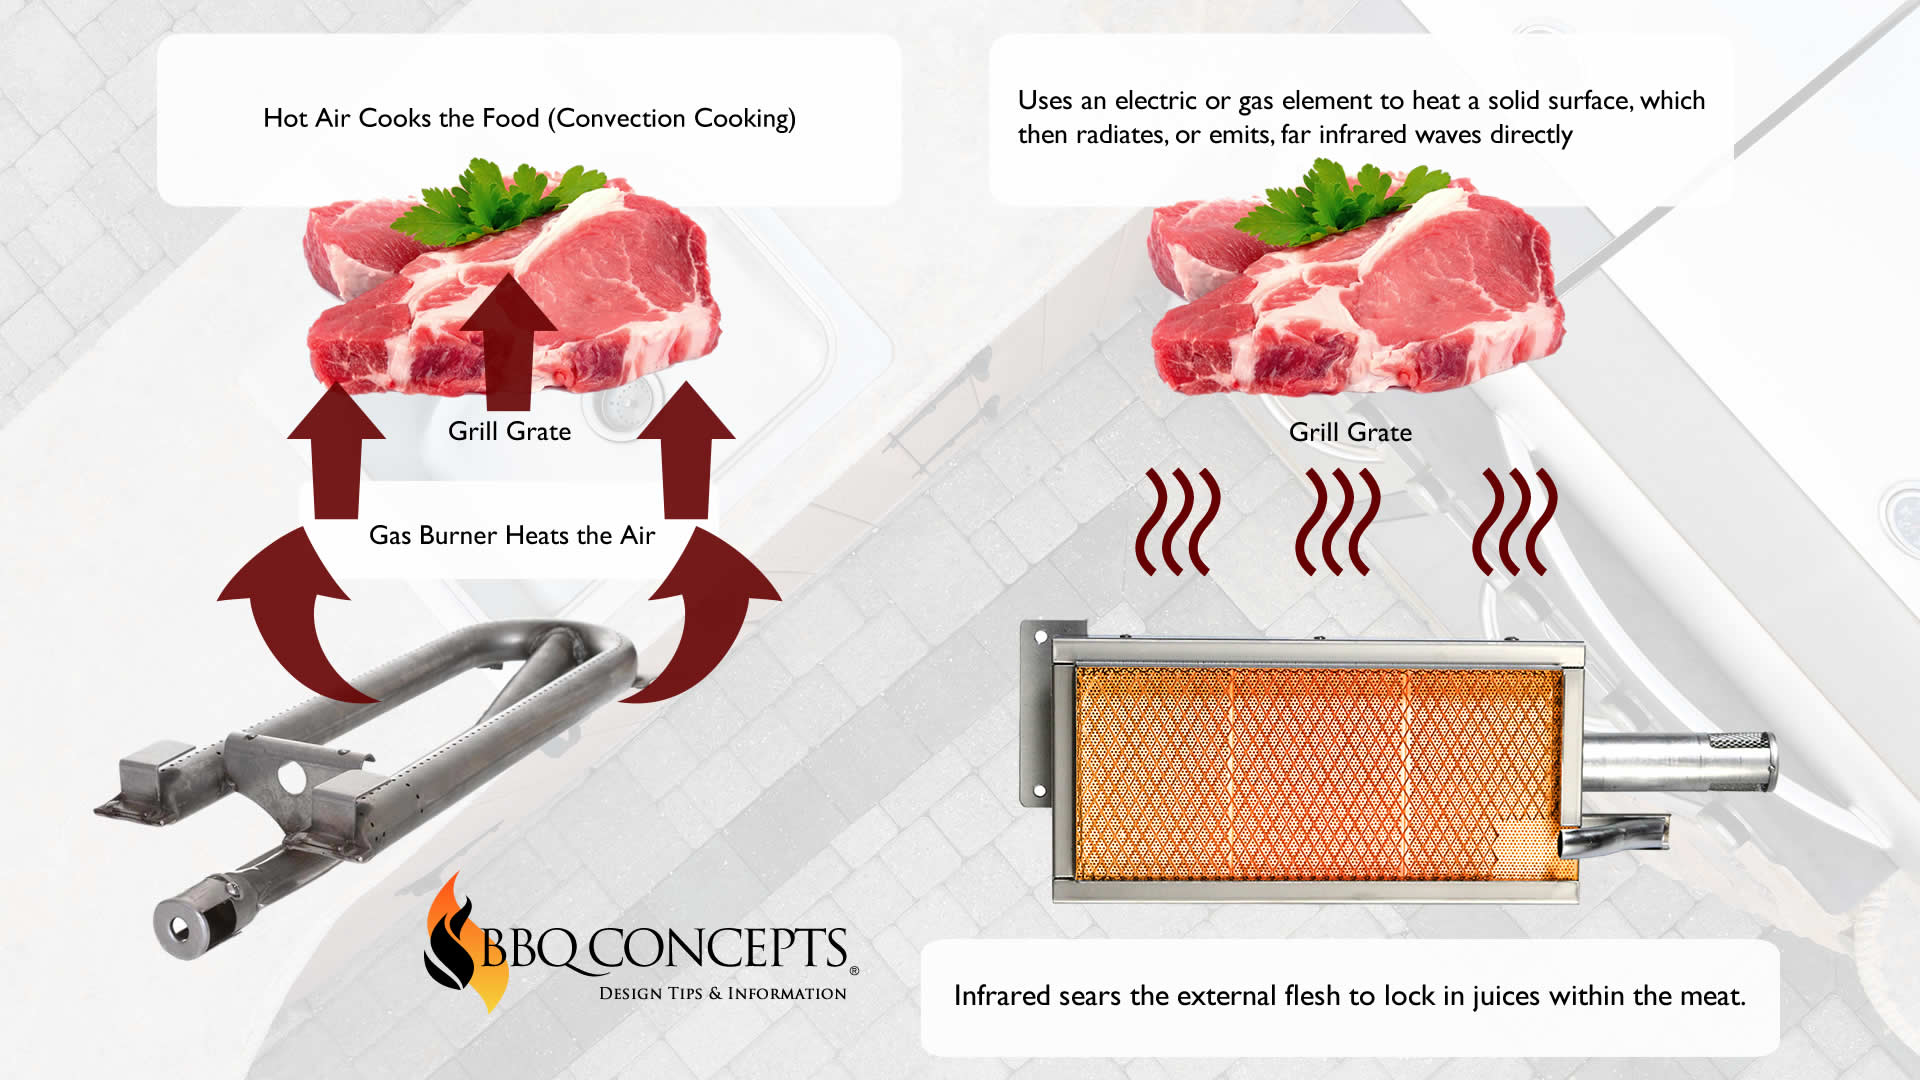
Traditional gas and charcoal grills rely on convection heat—superheated air constantly circulating around food. This continuous airflow strips away surface moisture, explaining why home-grilled steaks often turn out dry despite careful timing. Infrared grills eliminate this problem by replacing convection with radiant heat transfer. Instead of heating air, they use a burner to superheat an emitter surface (ceramic tile, stainless plate, or glass-ceramic panel) until it glows, emitting far-infrared electromagnetic waves. These waves penetrate food’s moisture barrier without disrupting it, delivering energy directly to surface molecules. The result? Steaks sear in 90 seconds while retaining juices that conventional grills evaporate.
Critical Performance Differences You’ll Notice Immediately
- 1,000°F searing capability versus 650°F max on standard gas grills
- 3-minute preheat times compared to 15 minutes for charcoal
- 35% less moisture loss due to undisturbed surface vapor layer
- Zero flare-ups because drippings vaporize on the emitter plate
Igniting Perfect Sear: The 4-Stage Infrared Process
Gas Ignition Mechanics Explained
Your infrared grill starts with either a spark electrode (creating visible blue arcs) or hot-surface igniter (glowing orange like a toaster coil). Gas models ignite in seconds—no waiting for charcoal to ash over. Electric infrared systems skip ignition entirely, with resistance coils glowing instantly when powered. This immediate startup means you’re searing within 3 minutes versus 10+ minutes on conventional grills.
Emitter Plate Activation Sequence
As flames contact the emitter surface, watch for these visual cues:
1. First minute: Stainless plates turn dull red (600°F)
2. Two minutes: Ceramic bricks glow bright orange (800°F)
3. Three minutes: Surface hits 1,000°F—ideal for steak crust formation
Pro Tip: Never spray water on hot emitters—they can crack. Always let plates cool to warm (not hot) before cleaning.
Infrared Radiation Penetration Science
At peak temperature (1,400–1,800°F), the emitter radiates short-wave infrared energy (2–4 micrometers wavelength). These waves penetrate food 1–3mm deep, instantly triggering the Maillard reaction for caramelization. Crucially, they bypass the moisture boundary layer—unlike convection heat that evaporates surface juices. This is why infrared-grilled chicken thighs stay juicy even with crisp skin.
Emitter Types Compared: Which Design Fits Your Needs
| Emitter Type | Max Temp | Best For | Cleaning Difficulty | Top Models |
|---|---|---|---|---|
| Perforated ceramic brick | 1,000°F | Steak stations | ★★☆☆☆ | Napoleon SIZZLE ZONE™ |
| Stainless + ceramic briquettes | 900°F | Full-grill cooking | ★★★☆☆ | Char-Broil TRU-Infrared™ |
| Glass-ceramic plate | 1,000°F | Built-in luxury grills | ★★★★☆ | Lynx Trident |
| Solid ceramic tile | 1,000°F | Commercial use | ★★★★★ | Early restaurant systems |
Critical Insight: Aftermarket “infrared grates” for standard grills don’t replicate true performance. Real infrared requires precise burner-to-emitter spacing (1.5–2 inches) impossible to retrofit.
Flare-Up Elimination: The Grease Vaporization System
Infrared grills stop flare-ups at the source through three engineered safeguards:
1. Emitter barrier: Drippings hit the 1,000°F plate instead of open flame
2. Instant vaporization: Fat converts to flavor-enhancing smoke in seconds
3. Drip-shield channels: Direct excess grease to removable trays
Unlike traditional grills where flare-ups char food unevenly, infrared systems turn drippings into aromatic smoke—especially noticeable when searing ribeyes. The absence of direct flame contact also reduces carcinogenic compound formation by 20% compared to open-flame grilling.
Fuel Efficiency Secrets: Why Infrared Saves Propane
Independent tests confirm infrared grills use 30–50% less fuel during preheating and cooking. Two physics principles drive this:
– Focused energy transfer: 80% of heat goes directly to food versus 40% in convection systems
– Heat reflection: Emitter plates bounce thermal energy upward instead of losing it through grill walls
A typical 1-inch ribeye cooks in 8 minutes on infrared versus 14 minutes conventionally—translating to 43% less propane per cookout. For frequent grillers, this offsets infrared’s higher upfront cost within 2–3 years.
Perfect Steak Technique: Timing Is Everything
Step-by-Step Sear Protocol
- Preheat emitter to 900–1,000°F (no lid—critical for direct radiation)
- Place steak on hottest zone (surface should sizzle immediately)
- Sear 90 seconds per side—set timer! Food scorches in 30 seconds past this
- Rotate 45° for cross-hatch marks during final 30 seconds
- Rest 4 minutes before slicing
Warning: Never use infrared for low-and-slow BBQ on its own. Pair with standard burners: cook chicken at 225°F using convection heat, then finish with 60-second infrared sear.
Moisture Retention Demystified: The Boundary Layer Effect
All food has a moisture boundary layer—a microscopic vapor shield protecting surface juices. Convection heat destroys this layer through constant airflow, causing evaporation. Infrared waves penetrate this layer without disturbing it, delivering energy straight to food molecules. Think of it like sunlight warming your skin through glass—it heats you without moving the air. This preserves up to 35% more internal moisture, explaining why infrared-grilled salmon stays succulent while conventional methods dry it out.
Maintenance Must-Dos: Avoid Costly Emitter Damage
Daily Critical Steps
- Scrape emitters while still warm (not hot) with brass brush
- Empty drip trays immediately after cooking—congealed grease causes corrosion
- Check burner ports for spider nests (common in stored grills)
Annual Failure Points to Inspect
- Hairline cracks in ceramic (replace if wider than credit card)
- Burner-to-plate spacing (must be 1.5–2 inches for optimal radiation)
- Igniter alignment (misfiring causes uneven heating)
Pro Tip: Soak ceramic emitters in warm, soapy water—not degreasers. Harsh chemicals degrade emissivity over time.
Troubleshooting Top 3 Infrared Issues

Problem: Uneven Heating Patterns
Cause: Burner clogs or emitter plate warping
Fix:
1. Turn off gas and let cool completely
2. Remove emitter plate and clean burner ports with pipe cleaner
3. Verify plate lies flat with no warping (replace if bent)
Problem: Weak Searing Despite High Temp
Cause: Emitter plate emissivity degradation
Solution:
– For stainless models: Apply high-heat grill paint to restore emissivity
– For ceramic: Replace if >3 years old (emissivity drops 15% annually)
Problem: Excessive Smoke on Startup
Cause: Oil buildup on cold emitters
Prevention:
– Wipe plates with damp cloth before first use each season
– Never use cooking spray directly on emitter surfaces
Quick Answers: Infrared Grill FAQs
Does it work for pizza?
Absolutely—700°F emitter plates create perfect leopard spotting in 4 minutes. Use a pizza stone directly on the emitter for best results.
Can I use wood chips?
Yes, but in a smoke box placed away from the emitter. Direct contact cools the plate, reducing infrared efficiency.
Why do steaks cook faster but stay juicier?
Infrared’s rapid surface sear creates an instant moisture barrier. Conventional grills slowly heat the surface, allowing juices to escape during prolonged cooking.
Do I need special tools?
Only a laser thermometer ($20) to verify emitter temps. Standard grill thermometers can’t measure radiant surface heat accurately.
Mastering how does an infrared grill work transforms backyard cooking from hit-or-miss to precision artistry. By harnessing electromagnetic radiation instead of hot air, these systems deliver restaurant-quality sears in minutes while locking in juices conventional grills evaporate. The initial investment pays off through faster cook times, reduced fuel costs, and—most importantly—steaks that stay succulent from edge to edge. Whether you’re upgrading your grill or troubleshooting an existing infrared system, understanding this radiant heat science ensures every cookout delivers flawlessly caramelized, juicy results. For best performance, pair your infrared burner with standard grilling zones to handle everything from delicate fish to 18-hour brisket—proving that sometimes, the hottest technology is literally the coolest thing in your backyard.