How to Choose a Patio Heater: Quick Guide
This post contains affiliate links. As an Amazon Associate, we earn from qualifying purchases.
Chilly evenings shouldn’t force you indoors when you’ve invested in beautiful outdoor living space. As temperatures drop, the right patio heater transforms your backyard into a year-round retreat where conversation flows as freely as your favorite beverage. But with so many options flooding the market—from freestanding propane models to sleek wall-mounted electric units—selecting the perfect heater feels overwhelming for most homeowners.
This guide cuts through the marketing hype to deliver exactly what you need to make a confidence-inspiring decision. You’ll discover how to calculate the precise BTUs required for your specific space, identify which fuel type aligns with your lifestyle, and recognize the critical safety features that separate reliable heaters from potential hazards. By the end, you’ll know exactly how to choose a patio heater that delivers consistent warmth without breaking your budget.
Measure Your Space Before Shopping for Patio Heaters
Don’t waste money on an undersized or oversized heater—your space dimensions dictate everything else. Grab a tape measure and calculate your exact heating needs before browsing models.
Calculate Your Exact Heating Area
Simple formula: Length × Width = Total square footage needing heat
Example: A 20×15 foot patio requires 300 square feet of coverage
This number becomes your baseline for determining required BTUs. For irregularly shaped spaces, divide into rectangles, calculate each section, then add them together. Remember that your heater won’t effectively warm areas beyond your seating arrangements, so focus on where people actually gather.
Account for Real-World Coverage Variables
Covered spaces like pergolas or gazebos need 25% fewer BTUs since heat doesn’t escape upward. Windy locations demand 30-50% more power to maintain comfort. Tall ceilings or open sides dramatically increase your requirements—you’ll need approximately 40 BTUs per square foot instead of the standard 20.
Pro tip: Map your seating arrangements first. Heat travels in circles from most freestanding units—position chairs within the warmth zone, not just inside your patio boundaries. A 9-foot heater creates an effective 20-foot diameter warmth circle in open spaces, but this shrinks significantly in windy conditions.
Check Installation Surfaces for Stability
Solid foundations work best for freestanding models—avoid placing heavy units on wooden decks without reinforcement. Wall studs must support 30-50 pounds for mounted units; use a stud finder before installation. Ceiling joists need professional inspection before hanging heaters overhead, especially in older homes.
Critical warning: Never place freestanding heaters on unstable surfaces. Lightweight bases under 30 pounds create dangerous tipping hazards in even mild winds. Your heater’s stability directly impacts safety—check manufacturer specifications for minimum base weight requirements.
Pick Your Fuel Type Based on Usage Patterns
Your choice between gas, electric, or pellets shapes every other decision. Don’t commit until you understand how each fuel type performs in real-world conditions.
Natural Gas: Permanent Power for Frequent Entertainers
Best for: Homeowners who entertain weekly and have existing gas lines
Performance: 30,000-43,000 BTUs heating 120-200 square feet continuously
Monthly cost: $15-30 for regular use (cheapest long-term option)
Installation reality: Requires certified technician and building permits—once installed, you’re committed to the location.
Red flag to watch for: Skip natural gas if your gas meter sits far from the patio—installation costs skyrocket with distance. Most homeowners spend $1,000-2,000 for gas line extensions, making propane more economical in these scenarios.
Propane: Maximum Flexibility for Seasonal Users
Best for: Renters, seasonal users, or those who change layouts frequently
Runtime: 20-pound tank provides 8-10 hours at 40,000 BTU
Hidden costs: Tank refills at $15-25 each add up quickly—budget $375 annually for 15 uses per season
Storage rules: Tanks must live outdoors—never store in basements or garages due to explosion risks.
Smart hack: Buy two tanks. When one empties mid-party, simply swap in the full tank instead of waiting for refills. Keep spare tanks in a covered outdoor area away from direct sunlight.
Electric: Safe Simplicity for Covered Spaces
Best for: Covered patios, balconies, or enclosed spaces
Coverage: 1,500 watts heats a 12-foot circle effectively
Installation: 120V models plug into standard outlets; 240V requires electrician
Weather advantage: Operates safely under roofs and awnings where gas can’t go due to ventilation requirements.
Reality check: Operating costs run 2-3x higher than natural gas in most regions. At $0.12/kWh, a 40,000 BTU equivalent electric heater costs $1.80 per hour versus $0.50-$1.00 for natural gas.
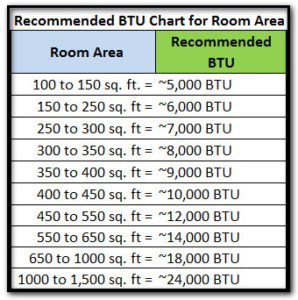
Decode BTU Requirements for Your Climate
Match Heater Power to Your Specific Needs
| Your Space Size | Required BTUs | Heater Type Needed |
|---|---|---|
| Small balcony (100 sq ft) | 5,000-6,000 | Tabletop electric |
| Intimate seating (200 sq ft) | 8,000-10,000 | Single propane |
| Dining area (400 sq ft) | 12,000-15,000 | Natural gas or dual propane |
| Large deck (800 sq ft) | 20,000-25,000 | Multiple units or commercial model |
Pro calculation: 500 square feet × 20 BTU × 1.3 (cold climate) = 13,000 BTU minimum. This formula prevents the common mistake of buying an undersized heater that runs constantly without warming your space.
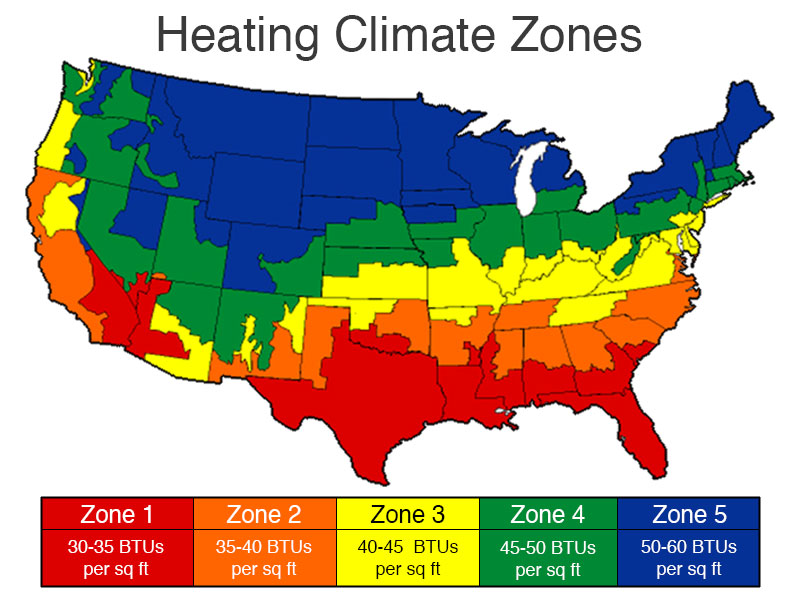
Adjust for Local Weather Conditions
Cold regions: Add 30-40% more BTUs to maintain comfort. Windy locations: Increase requirements by 25-50%—position heaters perpendicular to prevailing winds. Covered patios: Reduce requirements by 20-25% since heat doesn’t escape upward.
Critical mistake to avoid: Don’t base your decision solely on square footage. A 400 sq ft open deck needs significantly more power than a 400 sq ft covered patio. Always factor in your specific environmental conditions.
Choose Your Installation Style for Maximum Effectiveness
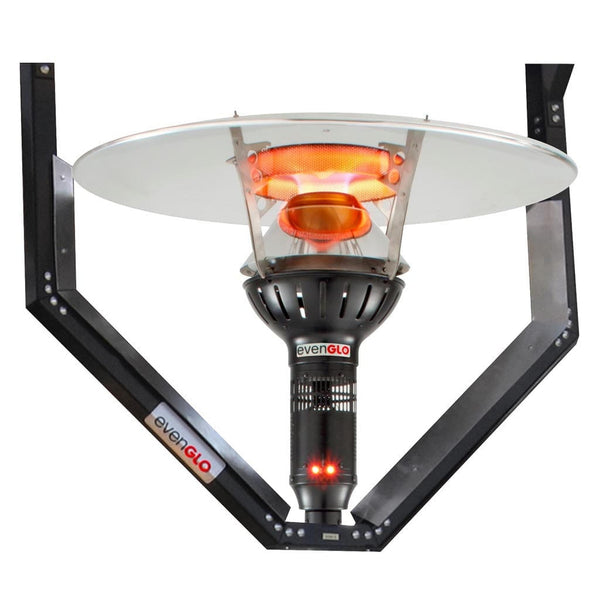
Freestanding Mushroom Heaters for Open Areas
Height: 7-9 feet tall with weighted bases
Coverage: 360-degree heat reaching 20-foot diameter in open spaces
Best placement: Center of seating areas, away from foot traffic
Mobility bonus: Wheels included—rearrange for different events
Stability concern: Requires 30+ pound base minimum; lightweight models topple in wind.
Pro tip: Look for models with never-tip technology if you live in windy areas. These units automatically shut off if they tilt beyond 15 degrees, preventing dangerous accidents.
Wall-Mounted Units for Space-Constrained Patios
Installation height: 6-8 feet from ground level
Space saver: Zero floor footprint—perfect for narrow balconies
Heat pattern: Directional projection rather than circular
Fuel options: Natural gas or electric only (propane tanks too heavy for walls)
Structural requirement: Must anchor into wall studs—not just siding or drywall.
Critical installation step: Use a stud finder to locate solid framing before mounting. Wall-mounted heaters require proper structural support—never attach to vinyl siding or drywall alone.
Safety Features That Prevent Dangerous Accidents
Non-Negotiable Safety Components
Tip-over switch: Automatic shutoff when tilted beyond 15 degrees—mandatory for all freestanding units. ODS sensor: Cuts gas supply if oxygen drops below safe levels—prevents carbon monoxide buildup. Thermal cutoff: Prevents overheating and fire hazards during extended operation. Certification marks: Look for UL, CSA, or ANSI approval stickers—avoid uncertified models.
Critical warning: Skip any heater without these safety features. Inexpensive knockoffs often omit these protections, creating serious fire and carbon monoxide risks.
Maintain Proper Clearance Distances
Minimum distances:
– 3 feet from furniture and railings
– 5 feet from house walls
– 8 feet from overhead structures
– Stable, level surface always
Wind considerations: Weighted bases under 30 pounds create hazards in gusty areas. In windy locations, opt for wall-mounted or permanently installed units for maximum safety.
Calculate True Ownership Costs Before Buying
Break Down Long-Term Expenses
Natural gas: High upfront ($1,500-3,500) + lowest operating = savings after 2-3 seasons of regular use
Propane: Low upfront ($300-800) + high fuel costs ($375 annually) = expensive for frequent entertaining
Electric: Medium upfront ($400-1,200) + medium costs ($1.80/hour) = predictable year-round expenses
Hidden cost alert: Gas line installation averages $1,000-2,000 if your meter sits far from the patio. Always get an installation quote before committing to natural gas.
Smart Buying Strategy for Lasting Satisfaction
Match Heater Type to Your Lifestyle
Choose natural gas if: You entertain weekly, have existing lines, want permanent solution
Choose propane if: You need flexibility, rent your home, use seasonally
Choose electric if: You have covered spaces, want plug-and-play simplicity
Choose pellets if: Sustainability matters, you have dry storage space
Warranty red flags: Avoid models with 90-day coverage—reputable brands offer 1-3 years. Check if professional installation is required for warranty validity, and confirm commercial use exclusions if you run a business from home.
Your perfect patio heater balances heat output, fuel convenience, and budget reality. Measure twice, calculate BTUs accurately, and prioritize safety features over aesthetics. The right choice extends your outdoor season by months, creating the perfect backdrop for memories that last long after summer ends. With this knowledge, you’re now equipped to confidently choose a patio heater that delivers consistent warmth without unexpected costs or safety concerns.