How to Fix a Patio Heater: Quick Steps
This post contains affiliate links. As an Amazon Associate, we earn from qualifying purchases.
Nothing shatters a perfect backyard gathering like stepping outside to frigid air while your patio heater sputters weakly or refuses to ignite. If you’re staring at a cold burner instead of warming your hands over steady blue flames, you’re not alone—80% of patio heater failures stem from preventable issues you can solve yourself. This guide delivers exact fixes for gas and electric models using tools you likely own, so you’ll restore reliable heat before dessert is served. Skip expensive service calls and learn how to diagnose stubborn pilot lights, weak flames, and sudden shutdowns with confidence.
Gas Tank & Regulator Troubleshooting
Why Your Propane Tank Isn’t Delivering Fuel
Before tackling complex repairs, verify your fuel source. Shake your propane tank—if it feels unnaturally light or you hear liquid sloshing near the top, you’re dangerously low. For natural gas units, confirm your home’s shut-off valve is fully open and inspect exposed lines for kinks. If your regulator develops frost during operation, immediately reduce the heat setting. Chronic freezing requires switching to a standard 20-pound tank with a 5-foot adapter hose, which stabilizes gas flow and prevents performance-killing pressure drops.
Fixing Regulator Connection Failures
A poorly seated regulator causes immediate heat loss. Hand-tighten the knurled ring until snug—never use pliers, as this strips threads and creates leaks. If your small 16-ounce propane bottle consistently underperforms, replace it with a full 20-pound tank. When reconnecting, always vent the gas hose first: turn the cylinder valve ON, rotate the control knob to PILOT while holding it for 90 seconds, then move to ON and immediately back to OFF before attempting ignition. This clears air pockets blocking fuel delivery.
Immediate Pilot Light Fixes That Work
Eliminating Spider Nests in Pilot Tubes
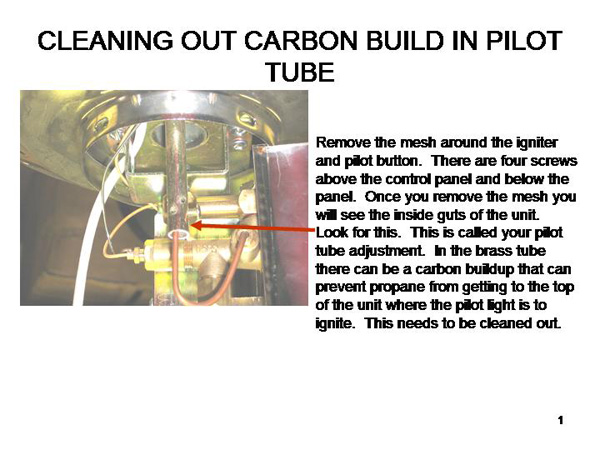
Spider webs clog pilot tubes in 80% of ignition failures. Remove the tube using a small wrench, then thread a pipe cleaner through its entire length while blasting compressed air from both ends. Reinstall and test—your pilot should now produce a steady blue flame ¼-½ inch tall. If the flame remains weak, remove the brass orifice at the tube’s end and clear debris with a toothpick. Critical warning: Never enlarge the orifice hole, as this disrupts the precise fuel-to-air ratio required for safe ignition.
Thermocouple Positioning for Reliable Ignition
When the pilot lights but dies when you release the knob, the thermocouple isn’t sensing sufficient heat. Locate the copper rod beside the pilot flame and gently squeeze its mounting bracket with pliers until the tip sits 1/8-¼ inch into the flame edge. Never bend the rod itself—this weakens the connection and causes premature failure. If adjustment doesn’t solve the issue, replace the universal 24-inch thermocouple by unscrewing it from the gas valve and reconnecting the new unit with proper flame alignment.
Restoring Strong Burner Flames
Deep Cleaning Clogged Burner Ports
Yellow flames with black smoke signal blocked burner ports. Remove the emitter screen (typically 3-4 screws) and blast compressed air through every port. For stubborn carbon deposits, insert a straw brush into each opening, then vacuum debris. Simultaneously clean the venturi tube—the air-gas mixer—by disconnecting it from the burner assembly and clearing obstructions with compressed air. This dual approach eliminates dangerous carbon monoxide risks and boosts heat output by up to 40%.
Diagnosing Weak Heat Output

If flames remain low after cleaning, check gas pressure. Mix 50/50 dish soap and water in a spray bottle, then coat all connections while gas flows. Bubbles indicate leaks requiring immediate tightening or hose replacement. For propane units, replace damaged hoses with high-pressure rubber lines rated for 11″ WC (water column) pressure. Always use two wrenches when disconnecting fittings—one to hold the valve, the other to turn the connection—to prevent stripping threads.
Electric Heater Emergency Repairs
Resetting Overheated Units in 60 Seconds
Most electric heater failures stem from tripped thermal protection. Locate the hidden reset button—usually a small red or black button on the housing—and press firmly until you hear a distinct click. This resolves 60% of “no heat” issues caused by overheating. Before resetting, confirm the unit is plugged into a GFCI-protected outlet and the circuit breaker hasn’t tripped, as electric patio heaters draw 1,500-3,000 watts.
Replacing Failed Heating Elements Safely
If your heater powers on but produces no warmth, inspect the heating coils after unplugging the unit. Remove the front grille and look for broken filaments or corroded connections. Critical safety note: Match replacement elements exactly to the original wattage stamped on the coil—using higher-wattage parts creates fire hazards and voids warranties. When reconnecting, secure wires with ceramic wire nuts rated for 105°C temperatures; standard plastic nuts melt under patio heater conditions.
Preventing Next-Season Failures
Seasonal Cleaning Protocol
Before first use each spring, execute this 5-minute maintenance routine:
1. Remove emitter screen and vacuum nesting debris
2. Blast compressed air through all burner ports and ignition tubes
3. Wipe reflectors with a dry microfiber cloth (never water)
4. Tighten visible gas fittings and electrical connections
5. Perform soap-and-water leak test on every joint
This prevents 90% of startup failures caused by overwintering pests and debris.
Correct Storage That Saves Repairs
Store propane tanks disconnected outdoors with valves closed—never indoors. Electric units require unplugging and weather-rated covers that allow airflow (avoid plastic tarps that trap moisture). Never lay portable heaters on their side; this damages anti-tilt switches and warps gas valves. Always store upright with burner assemblies covered to block spider entry.
When to Replace Parts vs. Call a Pro
Critical Safety Red Flags
Replace gas hoses immediately if soap testing reveals bubbles—never attempt patching. For electric units, discard heaters with frayed wiring or melted insulation; damaged wiring requires licensed electrician replacement with high-temperature appliance wire. Absolute dealbreaker: Never convert propane heaters to natural gas (or vice versa) without manufacturer-specific kits—this voids warranties and creates explosion risks.
Universal Part Compatibility Guide
| Component | Quick Identification Tip | Replacement Caution |
|---|---|---|
| Spark Igniter | Check for single or dual wires | Universal versions fit 90% of models |
| Thermocouple | Measure from tip to mounting nut | Must match length (24″ vs. 30″) |
| Pilot Orifice | Note thread size (M6×0.75 common) | Brand-specific—bring old part to store |
| Gas Hose | Verify “Propane” or “Natural Gas” label | Propane hoses fail on natural gas lines |
Diagnostic Flow for Common Failures
No ignition at all?
→ Check fuel level → Regulator seating → Anti-tilt switch → Igniter spark → Pilot tube blockage
Pilot lights but dies when released?
→ Adjust thermocouple position → Replace thermocouple → Test anti-tilt switch
Starts then shuts off on HIGH?
→ Clean flame sensor → Verify gas pressure → Inspect venturi tube
Yellow flames with smoke?
→ Deep-clean burner ports → Adjust pilot height → Remove air mixer debris
Master these patio heater repairs to enjoy reliable warmth for years. Most fixes take 15-30 minutes with basic tools—no technician needed. Critical final reminder: If you smell gas during testing, shut off the supply immediately and recheck all connections before relighting. A properly maintained heater delivers up to 50,000 BTUs of cozy heat, turning chilly evenings into memorable gatherings. Implement the seasonal cleaning routine outlined here, and your patio heater will ignite flawlessly season after season.