How to Fix Patio Furniture: Quick Repair Tips
This post contains affiliate links. As an Amazon Associate, we earn from qualifying purchases.
Your favorite outdoor chair wobbles dangerously, peeling paint exposes rust underneath, and mildew has permanently stained your cushions—this isn’t just an eyesore, it’s a safety hazard threatening your summer enjoyment. Before you waste hundreds replacing furniture that’s structurally sound, know that 90% of patio furniture failures can be reversed with basic tools and a weekend of focused work. This guide delivers the exact steps to diagnose, repair, and prevent the six most common outdoor furniture disasters, using only proven techniques from professional restoration workshops. You’ll master how to fix patio furniture for aluminum frames, wooden slats, sagging wicker seats, and torn sling fabrics while avoiding costly mistakes that accelerate damage.
Diagnose Patio Furniture Failures in 5 Minutes
Spot Material-Specific Damage Instantly
Don’t waste time guessing—perform this targeted inspection: For metal frames, look for white chalky residue (aluminum oxidation) or orange streaks (iron rust) near joints. Press firmly on seat rails; if they wobble or feel spongy, you’ve got corrosion compromising structural integrity. Wooden pieces reveal trouble through soft spots when pressed with your thumb—especially near bolt holes—and gaps wider than 1/16 inch at joints. With wicker, run your fingers along strands; snapped reeds create visible gaps, while gray discoloration signals UV degradation. Fabric issues scream for attention: flattened cushions that don’t rebound within 30 seconds need foam replacement, and musty odors mean mold has penetrated the batting. Critical red flag: If metal frames buckle under light pressure or wood feels “mushy,” stop immediately—these indicate irreparable structural failure requiring professional help.
Prioritize Repairs by Safety Risk
Rank problems from most to least urgent: Structural instability (wobbling legs, cracked frames) takes top priority because it risks injury. Next address surface hazards like sharp metal burrs or splintered wood that could cause cuts. Cosmetic issues like faded fabric or minor paint chips come last—these won’t compromise safety but accelerate deeper damage if ignored. Pro tip: Photograph each flaw with your phone; this creates a repair roadmap and helps track progress. Most weekend warriors waste hours on low-priority tasks—stick to this order and you’ll complete 80% of critical fixes in under four hours.
Gather These Exact Repair Supplies
Your Weekend Repair Toolkit
Skip generic “tools you might need” lists—grab only these essentials: A cordless drill with 1/4″ hex bits handles 95% of disassembly/reassembly. For metal work, a wire wheel attachment (or hand wire brush) removes rust faster than sandpaper alone. You’ll need three grits of sandpaper: 120-grit for heavy prep, 220-grit for smoothing, and 400-grit for final finishing. Non-negotiable specialty items: Rust converter (like Ospho) chemically stops corrosion better than scraping alone, and self-etching metal primer bonds to bare metal where regular paint fails. For wood repairs, marine-grade polyurethane outlasts standard sealants by 3x in UV exposure. UV-resistant fabric patches prevent tears from spreading—regular fabric tape disintegrates outdoors within months.
Match Consumables to Your Furniture Material
Don’t buy generic supplies—tailor your purchases: For rusted steel frames, get rust-resistant enamel spray paint (not oil-based) that flexes with metal expansion. Aluminum needs non-abrasive cleaners—vinegar solutions etch the surface. Wooden furniture requires exterior wood glue with waterproof certification (look for ANSI Type I on the label). When replacing wicker strands, soak natural reed for 30 minutes but skip this step for synthetic resin—weaves differently when dry. Cushion foam must be high-density (1.8+ lb/cu ft); cheap foam compresses to half-thickness in one season. Cost-saving hack: Buy sling fabric by the yard from Phifertex®—a single 54″ width covers 3-4 chairs versus pre-cut kits that charge per seat.
Repair Rusting Metal Frames in Hours

Eliminate Rust Permanently (Not Just the Surface)
Scraping alone guarantees recurrence—follow this pro sequence: First, attach a wire wheel to your drill and scrub until you see bright, uniform metal (no brown streaks). Next, apply rust converter with a disposable brush—it turns rust black and creates a paintable surface. Critical mistake to avoid: Skipping the 24-hour cure time before priming; the chemical reaction isn’t complete. After curing, spray self-etching primer in two thin coats (heavy coats cause drips). Wait one hour, then apply rust-resistant enamel in three ultra-light passes—thick paint traps moisture underneath. Time tracker: This process takes 3 hours active work plus 24 hours drying, but prevents recurring rust for 3+ years.
Fix Bent Legs Without Specialized Tools
For minor bends: Place the frame upside down on concrete, insert a 2×4 through the bent leg, and apply downward pressure while bracing adjacent legs. Severe bends need leverage: Clamp the frame securely in a vise, slide a pipe over the bent section for added torque, and bend slowly—you’ll hear micro-cracks when metal fatigues (stop immediately if this happens). Emergency fix for cracks: Drill 1/8″ holes at both ends of the crack to prevent spreading, then bolt a stainless steel plate over it using fender washers. This creates instant stability until you can weld properly.
Save Splintered Wood Furniture for $20
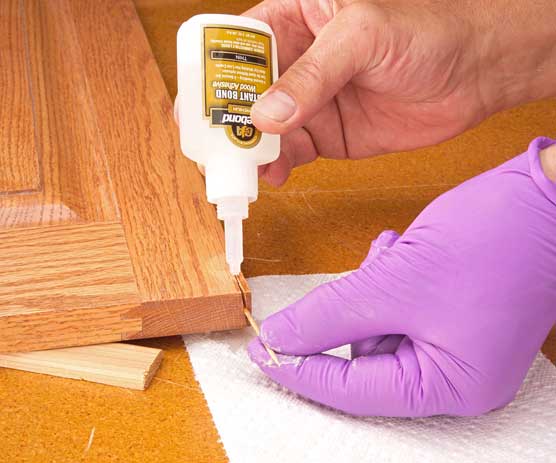
Stop Cracks From Spreading Overnight
Hairline splits need immediate action: Inject exterior wood glue using a syringe (not a brush—it won’t penetrate deep enough), then clamp with bar clamps for 24 hours. For deep cracks exposing the wood’s interior, clean out debris with compressed air first—trapped dust prevents glue adhesion. Pro move: Drill 1/8″ holes perpendicular to the crack every 2 inches before gluing; this channels glue deeper into the wood fibers. After clamping, wipe excess glue with a damp cloth—dried glue creates bumps that telegraph through your finish.
Refinish Like a Pro in One Weekend
Sand in stages: Start with 120-grit to remove old finish (follow the wood grain!), then switch to 220-grit for smoothness. Never skip the wipe-down with mineral spirits—it removes sanding dust that ruins finishes. Apply exterior stain with a lint-free cloth, working in 3-foot sections, and wipe off excess after exactly 7 minutes (set a timer!). For sealing, brush on marine-grade polyurethane in thin coats, sanding lightly with 400-grit between layers. Key insight: Three thin coats last longer than two thick ones—thick polyurethane cracks under UV exposure. Total time: 8 hours over two days for flawless results.
Revive Sagging Wicker and Torn Cushions
Replace Broken Weaves That Hold Weight
Natural reed requires soaking for 30 minutes to become pliable; synthetic resin weaves better dry. Weave new strands by following the existing pattern’s “over-under” sequence—count the rows to maintain consistency. Critical step: Apply wood glue to the strand ends and tuck them under adjacent weaves (don’t cut flush—that invites unraveling). Let cure 12 hours under light clamping pressure. For large sections, work from the center outward to distribute tension evenly—starting at the edge causes puckering.
Install Sling Fabric That Won’t Sag
Measure center-to-center of the frame rails (not outer edges!) and add 1 inch for tension. Remove end caps with a flathead screwdriver, then slide out the old sling by compressing the spline. Insert the new spline into the rail groove, starting at the seat’s center. Game-changing technique: Pull fabric taut with locking pliers while reinstalling rails—tighten bolts from the center outward to prevent wrinkles. Test tension by pressing the seat; it should rebound like a trampoline within 2 seconds.
Prevent Next Season’s Repairs Now
Monthly Maintenance That Takes 10 Minutes
After summer storms, hose down frames with a garden sprayer (never pressure wash—it forces water into joints). Shake cushions vigorously to fluff compressed foam. Every 30 days, tighten all bolts with a 1/4-turn—metal expands/contracts with temperature swings, causing loosening. Pro shortcut: Keep a labeled zip bag of spare bolts/hardware taped under your table—it eliminates hunting for replacements mid-repair.
Winterize Furniture in 20 Minutes Flat
Before the first frost, clean frames with mild soap, then apply automotive wax to metal—it repels moisture better than oil. Store cushions indoors in breathable cotton bags (plastic traps humidity causing mold). Elevate furniture on pallets in your garage—direct concrete contact wicks moisture into wood. Critical error: Using non-breathable plastic covers outdoors—they create a greenhouse effect that accelerates rot. Opt for 600D polyester covers with mesh vents.
When to call experts: Seek professional help for multiple frame fractures, intricate hand-woven rattan patterns, or matching powder-coated finishes. Search “patio furniture restoration near me” and verify they offer a 1-year warranty on repairs—reputable shops stand by their work. Most minor fixes take under 4 hours once you know the exact steps. By mastering these techniques, you’ll extend your patio furniture’s life by 5-10 years while saving $500+ in replacement costs. Start with today’s 5-minute diagnosis, tackle one repair this weekend, and reclaim your outdoor oasis before summer ends.