Masterbuilt Electric Smoker Won’t Heat Past 200: Troubleshooting Guide
This post contains affiliate links. As an Amazon Associate, we earn from qualifying purchases.
Your brisket should be climbing steadily toward that perfect 225°F smoking temperature, but your Masterbuilt electric smoker stubbornly refuses to budge past 200°F. This frustrating temperature ceiling affects countless pitmasters—especially when outdoor temperatures drop or after replacing components. Whether you’re using a digital model displaying consistent 200°F limitations or an analog unit stuck at 175°F, this specific heating problem has clear diagnostic paths and solutions.
This guide delivers proven troubleshooting steps specifically for Masterbuilt smokers that won’t exceed 200°F. You’ll learn to distinguish between simple environmental issues versus critical component failures—plus exactly how to fix each problem without wasting money on unnecessary parts. Most solutions require basic tools and take less than 30 minutes to implement.
Diagnose Your Masterbuilt Smoker’s 200°F Temperature Ceiling
Identify Your Specific Temperature Limitation Pattern
Your smoker’s exact behavior reveals the underlying problem. The 20075517 model commonly stalls at 175°F regardless of settings with minimal smoke production, while MB21072719 units often fail completely after heating element replacement. Analog models hit their 200°F ceiling most dramatically when loaded with 8+ pounds of cold meat, confirmed by both built-in and independent thermometers.
Digital models present additional clues—when temperature limitation coincides with inadequate smoke production, you’re likely facing control board issues rather than simple heating element failure. This dual symptom pattern helps you prioritize which components to test first.
Measure Environmental Impact on Heating Performance
Cold weather significantly contributes to the 200°F limitation problem. Documented cases show external temperatures of 48°F with “real feel” of 39°F combined with 11 mph sustained winds and 20 mph gusts can push uninsulated analog models below effective smoking temperatures. Your smoker’s location matters tremendously—units placed in exposed areas struggle more than sheltered ones, even with all components functioning properly.
Before diving into component replacement, assess your operating conditions. Move your smoker to a sheltered location and retest. If temperatures now exceed 200°F, you’ve identified an environmental issue rather than a component failure.
Test Your Heating Element for Critical Failures

Spot Visual Signs of Element Damage
Begin with a direct visual inspection—pull your smoker away from the wall and examine the heating element thoroughly. Look for these critical indicators: visible burns on the element surface, areas where metal appears melted or warped, or corrosion creating white/green buildup. Any visible damage confirms immediate replacement is necessary.
Partial element failure presents differently than complete failure. You might notice the element glowing red in sections while other areas remain dark, or observe it cycling on/off more frequently than normal. These symptoms suggest insufficient heating capacity—enough to reach 200°F but not surpass it.
Perform Accurate Continuity and Voltage Testing
Before testing anything, unplug your smoker completely. Remove the heating element (typically secured by two screws) and test continuity using a multimeter set to resistance (Ω). Touch probes to each element terminal—a functional element reads between 10-50 ohms. Readings outside this range confirm replacement necessity.
Next, verify voltage at the element terminals while plugged in and set to maximum temperature. You should measure 110-120V when the control calls for heat. Proper voltage with no heat production equals a failed element. No voltage indicates upstream electrical issues requiring further diagnosis.
Fix Temperature Control System Failures
Test Sensor and Thermostat Accuracy
Your temperature sensor acts as the smoker’s brain, constantly feeding data to the control board. These sensors typically cost $100-150 to replace, so accurate diagnosis saves significant money. Test sensor resistance at room temperature (should read around 10-15kΩ), then again in ice water (resistance should increase). Dramatic deviations from expected values indicate sensor failure.
Analog models require different thermostat testing. Remove the thermostat and test continuity between terminals while slowly rotating the dial. You should observe smooth continuity changes without dead spots or sudden jumps. Irregular patterns indicate thermostat failure requiring replacement.
Verify Control Board Voltage Output
Digital models rely on control boards to regulate element power. Test this by checking voltage output at the element connection points while setting temperature to maximum. The board should send full voltage initially, then modulate as temperature rises. No voltage output suggests board failure, while constant voltage without heating points to element issues.
Probe detection failures cause immediate shutdowns. If your control board doesn’t detect the temperature probe, it shuts down heating entirely as a safety measure. Verify probe connection first, then test probe resistance values against expected ranges before replacing expensive components.
Resolve Electrical Connection Issues
Confirm Power Supply Integrity
Start with the simplest possible causes—test your outlet with a multimeter to verify 110-120V output. GFCI outlets commonly trip due to moisture exposure, creating intermittent power issues that limit heating capacity. If your outlet tests fine, examine the entire power cord for cuts, chips, or loose connections where the cord enters the smoker body.
Breaker issues often masquerade as smoker problems. Check your electrical panel for tripped breakers or blown fuses. Electric smokers draw significant power—dedicated circuits prevent nuisance tripping that limits heating capacity.
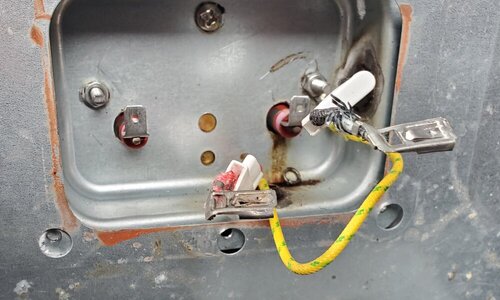
Clean Critical Connection Points
Corrosion causes more heating problems than actual element failure. Focus cleaning on these connection points: element terminals (where wires attach), control board connectors, and any junction points between components. Clean corrosion using a wire brush, then apply dielectric grease to prevent future issues.
Loose connections create resistance that reduces effective voltage reaching your heating element. Perform a “wiggle test” on every wire while the smoker is unplugged—any movement at connection points requires tightening or replacement. Even minor connection issues can cause the exact 200°F limitation you’re experiencing.
Overcome Cold Weather Temperature Limitations

Immediate Cold Weather Solutions
Uninsulated analog models suffer most when temperatures drop. Quick fixes include: relocating to a sheltered area, building a windbreak with plywood, or adding a welding blanket around the smoker body. These simple steps can add 50-75°F to maximum achievable temperatures during cold weather operation.
Preheat strategy changes significantly with weather. In cold conditions below 50°F, extend preheat to 45-60 minutes before adding meat. This allows the entire smoker mass to reach temperature, compensating for initial heat loss when you open the door to load meat.
Long-Term Cold Weather Performance
Add thermal mass using fire bricks or pizza stones in the bottom of your smoker—they absorb and radiate heat, smoothing temperature fluctuations. These additions particularly help analog models without digital controls maintain consistent temperatures.
Consider thermal blanket insulation for regular cold-weather smoking. Specialized smoker jackets add significant insulation value without fire risk. Secure with high-temperature wire—never use materials that can melt or burn near your heating element.
Step-by-Step Repair Protocol for 200°F Limitation
Immediate Troubleshooting Checklist
- Power reset: Unplug for 5-10 minutes to reset control board
- Connection cleaning: Clean all terminals with wire brush
- Seal verification: Perform dollar bill test around door seals
- Preheat extension: Allow 45-60 minutes preheat in cold conditions
Component Replacement Priority Order
- Heating element: First component to test/replace (most common failure)
- Temperature sensor: Second priority after element verification
- Thermostat: Separate component requiring individual testing
- Control board: Final component if all others check functional
Pro tip: Replace element terminals and high-temperature wire nuts simultaneously with any element replacement. Old connectors often contribute to the original failure and cause premature new element failure.
When to Seek Professional Help
Recognize Critical Warning Signs
Complete heating failure after element replacement suggests deeper electrical issues. Check voltage at element terminals first—no voltage indicates control board or wiring problems rather than component failure. Intermittent heating (works sometimes, fails others) usually indicates loose connections or failing control board that requires immediate attention.
Smoke production drops alongside temperature limitation often points to control board failures affecting both heating and wood chip ignition systems. These complex issues typically require professional diagnosis.
Cost-Effective Repair Decisions
Handle these yourself: heating element replacement, sensor replacement, cleaning connections, and basic electrical testing. These require only basic tools and save significant labor costs.
Call professionals for: control board replacement, internal wiring harness issues, or electrical problems beyond basic testing. Complex electrical diagnosis requires specialized equipment and expertise—especially for newer units still under warranty.
Your Masterbuilt smoker can reliably exceed 200°F once you identify the specific limitation cause. Start with basic power and connection checks, then systematically test components while considering environmental factors. Most 200°F ceiling issues stem from simple problems—corroded connections, failing heating elements, or cold weather impacts—rather than expensive control board failures. Implement these proven diagnostic steps, and you’ll be back to smoking perfect brisket at proper temperatures in under an hour. Remember: proper preheating, sheltered placement, and regular connection maintenance prevent most temperature limitation problems before they start.