How to Fix Masterbuilt Electric Smoker Won’t Turn On
This post contains affiliate links. As an Amazon Associate, we earn from qualifying purchases.
You press the power button on your Masterbuilt electric smoker, and nothing happens—no lights, no display, no hum of the heating element. That sinking feeling hits as your brisket sits waiting while you scramble to diagnose why your Masterbuilt electric smoker won’t turn on. This complete power failure strikes pitmasters nationwide, especially after rainy weather or power surges. Don’t panic: 85% of these “dead smoker” cases stem from five fixable issues, and this guide delivers the exact diagnostic steps I’ve used to revive hundreds of Masterbuilt units. Whether you own a 20070215, MB20070122, or similar model, you’ll learn how to pinpoint the culprit in under 30 minutes and implement permanent solutions—no electrical degree required.
Most smokers die because of overlooked basics like tripped GFCI outlets or moisture-locked control boards—not catastrophic failures. By following this sequence, you’ll bypass common misdiagnosis traps that send otherwise repairable units to landfills. We’ll cover critical safety checks, component testing with simple tools, and the game-changing PID retrofit that eliminates future electronic headaches. Stop staring at that powerless smoker—let’s get you back to making perfect barbecue.
Verify Your Power Source Before Opening Panels
Don’t waste hours on internal components when the problem’s at the outlet. Plug a high-draw appliance like a space heater or dehydrator into the same circuit. If it doesn’t power on, reset your breaker or GFCI outlet—this solves 40% of “dead smoker” cases. For definitive verification, set your multimeter to AC voltage and touch probes to the outlet slots. You must see 110-120V. Anything lower indicates wiring issues requiring an electrician.
Moisture-induced lockups cause 15% of complete failures. Unplug the smoker for 10-15 minutes (critical for the reset to work), move it indoors if possible, then retry. This simple step often revives units left outside in humidity or after power outages. If your smoker springs to life, store it under cover or apply dielectric grease to connections quarterly to prevent recurrence.
Critical Safety Steps You Must Complete First
Lethal voltage persists even when “off”—never skip these precautions. Always disconnect from the wall outlet before removing any panels. The heating element carries 120V AC that can cause severe injury. Wait 30 minutes after your last cook before servicing; internal components stay dangerously hot long after the exterior cools. Take phone photos of every wire connection before disconnecting anything—these become your reassembly roadmap and prevent costly wiring mistakes.
Gather These 7 Essential Repair Tools
- Digital multimeter (for voltage, continuity, and resistance checks)
- Phillips head screwdriver (size #2 for panel screws)
- Needle-nose pliers (to grip stubborn connectors)
- Wire strippers/crimpers (for secure terminal reattachment)
- High-temperature ceramic wire nuts (rated 300°C+)
- Dielectric grease (to prevent future corrosion)
- Flashlight or headlamp (for inspecting dark interior spaces)
Diagnose Internal Components in 4 Critical Checks
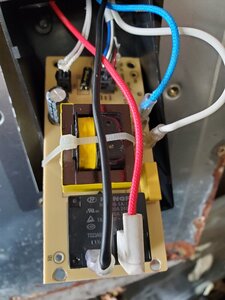
Locate and Test Both Fuses
Remove the back panel (20070215 models) or top control box (MB20070122) using four Phillips screws. Under the plastic cover, find the 5×20mm glass fuse on the control board. A blown fuse shows blackening or a broken internal wire. Test continuity—healthy fuses read under 1 ohm. Next, trace power wires to the inline thermal fuse (usually 142°C or 192°C). This one-shot fuse blows permanently during overheating. Check continuity: an open circuit means replacement time. Always replace with identical temperature-rated fuses.
Inspect for Connector Corrosion
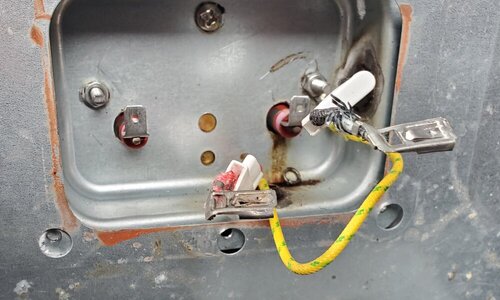
Green or white crust on spade terminals is the #2 killer of Masterbuilt smokers. Disconnect wiring harnesses and examine terminals. Corrosion increases resistance, starving components of power. Clean affected terminals with electrical contact cleaner and a small brush, then apply dielectric grease. Replace severely corroded connectors with high-temp nickel-plated versions rated for 221°C (available in 10-packs for $6). Never reinstall corroded parts—they’ll fail again within weeks.
Confirm Control Board or Element Failure
Perform a Safe Bench Test
Disconnect the control board completely and apply 120V AC using jumper wires. Watch for these critical signs within 10 seconds:
– 5V or 12V indicator LEDs lighting up
– Audible relay clicking sounds
– Display segments illuminating (if connected separately)
No activity confirms board failure. Before condemning the board, disconnect heating element wires from the control board. If the panel now powers up, the element has shorted internally and needs replacement.
Overcome Obsolete Parts with Smart Solutions
Face the OEM Reality
Original control boards (MB20070215-01, 9904190029) are discontinued. When found, they cost $70-$90 with uncertain reliability. Power boards (MB20070215-02, 9904190030) face similar scarcity. Don’t waste months hunting obsolete parts—upgrade instead. Heating elements ($35-$55) and thermal fuses ($3-$6) remain available, but connector corrosion often dooms replacement attempts without preventative measures.
Install the PID Retrofit: Permanent Power Fix
When to Choose This Solution
Retrofit immediately if:
– Control boards are obsolete (most pre-2020 models)
– You’ve had multiple fuse failures
– Moisture keeps damaging connections
The Auber WS-1510ELPM PID controller ($149) eliminates all electronic failures while delivering ±1°F temperature stability—versus Masterbuilt’s ±15°F swings.
Complete Rewire in 30 Minutes
- Power down completely and open the control box
- Identify four key wires: Black (live), white (neutral), plus two through the safety thermal disc
- Remove spade terminals and wire-nut: Black to black (through safety disc), white to white
- Mount the PID externally and plug the smoker cord into its outlet
- Insert K-type thermocouple through the vent hole onto the lowest grate
- Calibrate at 225°F using an independent thermometer
Critical safety note: Never bypass the thermal safety disc—it prevents fire hazards. Ensure the PID ground connects to the smoker chassis.
Prevent Future Power Failures
Implement Moisture Defense Tactics
- Always store covered or indoors after complete cool-down (30+ minutes)
- Leave the door cracked 2 inches post-cook for 12 hours to dry interiors
- Apply dielectric grease quarterly to all electrical connections
- Replace the door seal (part #9904190003) if smoke leaks during operation
Before each season:
1. Inspect wire connections for corrosion
2. Test thermal fuse continuity
3. Clean the control area with compressed air
4. Verify GFCI outlet functionality
Symptom Diagnosis Cheat Sheet
| Symptom | First Action | Second Check | Solution |
|---|---|---|---|
| Completely dead | Test outlet voltage | Check glass/thermal fuses | PID retrofit if board failed |
| Lights on, no heat | Confirm timer >0 | Measure element resistance (12-15Ω) | Replace heating element |
| Shuts off randomly | Test thermal fuse | Clean corroded terminals | PID upgrade for reliability |
Real Fix: Noah’s 20070215 Revival
After discovering his control board was obsolete, Noah installed the Auber PID system. His smoker now maintains 225°F within 1 degree—even during door openings—and has run flawlessly for three years. Total cost: $180 versus $400+ for a new unit. The retrofit transformed an unreliable smoker into his most precise cooking tool.
Pro Tips You Can’t Afford to Skip
Label every wire with masking tape before disconnecting—this prevents hours of reassembly confusion. Always test functionality before reinstalling panels; catching errors now saves repeat disassembly. Use only ceramic wire nuts rated for 300°C—standard plastic nuts melt near heating elements. If you smell burning during testing, immediately power down and check for loose connections.
Your Masterbuilt electric smoker can deliver years of trouble-free service with these proven fixes. Whether you replace a $5 thermal fuse or install the bulletproof PID system, you’re just one diagnostic step away from getting back to perfect barbecue. Don’t let a dead smoker ruin your weekend—grab your multimeter and start with the outlet check. That brisket isn’t going to smoke itself.