Grill Won’t Stay Lit: Quick Fix Tips
This post contains affiliate links. As an Amazon Associate, we earn from qualifying purchases.
Your burgers are charred outside but raw inside. Guests are getting hungry, and your grill just sputtered out—again. Whether you’re battling a gas grill that dies seconds after ignition or charcoal that refuses to hold heat, sudden flame failure turns relaxing barbecues into stressful disasters. The truth is, 90% of “broken” grills just need basic troubleshooting. Most flame-out issues stem from three core problems: fuel supply failures, airflow restrictions, or safety system triggers. This guide delivers exact steps to diagnose and fix why your grill won’t stay lit, using only proven techniques from grill manufacturers and fire science experts.
Charcoal Grill Dies Within Minutes? Solve These Critical Issues

Damp Briquettes Sabotage Ignition Every Time
Charcoal acts like a sponge, pulling moisture from humid air even inside sealed bags. When briquettes absorb over 5% moisture, they can’t reach the 450°F ignition temperature needed for sustained burning. Cheap briquettes with low carbon content (<50%) fail fastest in damp conditions.
Immediate solution: Spread briquettes in direct sunlight for 2–4 hours, flipping once. For emergency fixes, build a pyramid with completely dry briquettes at the base and slightly damp pieces layered on top. Premium lump charcoal or Japanese binchotan (hard-oak charcoal burning at 1,800°F) delivers reliable performance in humid weather. Always store unused charcoal in airtight bins with desiccant packs.
Ash-Clogged Vents Suffocate Your Fire
Just ¼-inch of ash buildup reduces airflow by 60%, starving your fire of oxygen. This is the #1 cause of charcoal grill flame failure. Blocked vents also cause dangerous carbon monoxide buildup inside the grill chamber.
Emergency fix: Open all vents fully. Use a long-handled brush to clear ash from lower vents while wearing heat-resistant gloves. For stubborn blockages, tap the grill body firmly to dislodge ash. Prevention: Empty the ash catcher after every cook—not just when full. Monthly deep-cleaning prevents rust from seizing vent mechanisms permanently.
Closing the Lid Too Early Extinguishes Flames
Putting the lid on before coals establish a stable bed is like smothering a candle. Charcoal needs 15–20 minutes of open-lid burning to develop a uniform layer of light gray ash across glowing red coals.
Perfect timing: Wait until coals glow red across the entire surface with light gray ash coating (like powdered sugar). Only then close the lid and adjust vents for temperature control. On humid days (>70% humidity), use 25% more starter fuel and pre-heat your chimney starter on a stovetop for 5 minutes.
Gas Grill Lights But Dies Seconds Later? Fix Fuel Flow Now
Regulator Bypass Mode Mimics Empty Tank
Your grill’s safety system accidentally throttles gas flow to just 10% of normal volume when triggered. This “bypass mode” feels like an empty tank but actually indicates a safety response to rapid valve opening, leaks, or overfilling. Symptom: Grill lights weakly then dies within 30 seconds.
Reset sequence (takes 90 seconds):
1. Open grill lid completely
2. Turn tank valve clockwise to close
3. Disconnect regulator hose
4. Turn all burner knobs to HIGH for 60 seconds
5. Turn knobs to OFF
6. Reconnect hose slowly, then open tank valve slowly
7. Ignite normally
Warning: If the grill still dies after resetting, test for gas leaks immediately—this could be a safety hazard.
Hidden Gas Leaks Starve Your Burners
Even pinhole leaks reduce pressure enough to kill flames. The leak test takes 3 minutes and prevents dangerous situations.
Testing method: Mix equal parts dish soap and water. Paint solution on hose connections, regulator, and burner manifold joints. Bubbles forming indicate leaks requiring immediate attention. Critical fix points: Tighten loose connections finger-tight plus ¼ turn with a wrench. Replace cracked hoses or damaged O-rings immediately—never tape leaks.
Tank Temperature Tricks You With False Readings
A “full” tank can deceive you. At 70°F, a 20-pound tank holds 18 pounds of propane. At 30°F, it holds just 15 pounds—enough for ignition but not sustained burning.
Three ways to check level:
– Hot water method: Pour hot water down the tank side. The cold line indicates fuel level.
– Weight check: Full tank = 38 pounds; empty = 18 pounds. Use a bathroom scale.
– Visual gauge: Magnetic strip types work best above 50°F.
Replace tanks over 12 years old regardless of content—expired tanks are a major hidden cause of flame failure.
Burner Tube Blockages That Kill Flames Instantly
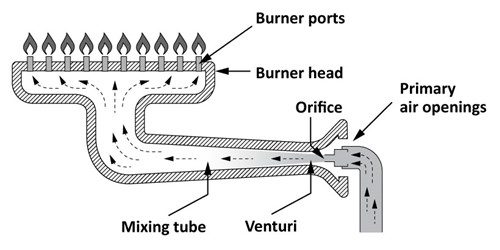
Spider Webs and Grease Clog Critical Ports
Insects, rust flakes, and hardened grease block burner ports, causing uneven flames and rapid extinction. Look for orange flames (instead of blue) or sections with no flame—these signal clogged ports.
Clearing procedure:
1. Turn off gas and let grill cool completely
2. Remove cooking grates and flavor bars
3. Use a brass wire brush or compressed air to clear burner tube ports
4. Verify burner tubes sit flush over valve orifices (misalignment causes 40% of flame failures)
5. Install $10 spider screens in burner tubes if you live in insect-prone areas
Pro tip: After clearing, turn burners on HIGH for 2 minutes to burn off residual debris before cooking.
Thermocouple Failures That Shut Off Gas Prematurely
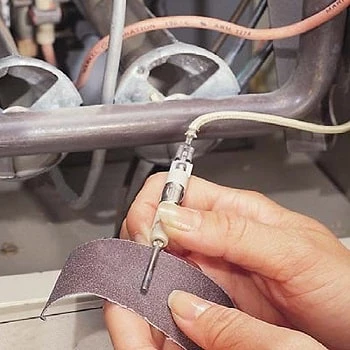
Carbon-Coated Flame Sensors Trigger Safety Shutdown
The thermocouple (a metal rod above the burner) must glow red-hot to signal “flame present.” Carbon buildup insulates it, causing the gas valve to shut off within 10 seconds of ignition.
Cleaning steps:
1. Turn off gas and let grill cool
2. Locate the thermocouple (thick wire next to burner)
3. Scrub with 000 steel wool until shiny
4. Verify 3–5mm gap between sensor tip and flame
Replacement rule: If cleaning fails and the flame dies within 10 seconds, replace the thermocouple ($15–$30). Most install in under 10 minutes with basic tools.
Environmental Fixes for Stubborn Flame Failure
Humidity Solutions for Reliable Ignition
Above 70% humidity, charcoal absorbs moisture faster than it burns. Gas grills also struggle as moisture cools burner tubes.
Countermeasures:
– Use 25% more starter fuel than normal
– Pre-heat chimney starter on stovetop for 5 minutes
– Target 500–600°F cooking zone where humidity becomes negligible
– Store charcoal with desiccant packs in sealed containers
Wind Positioning That Saves Your Cook
Wind direction matters more than speed. A breeze across lower vents starves coals; wind across top vents wastes fuel.
Optimal setup: Position grill perpendicular to steady wind. Use your body or a windscreen to block lower vents while allowing smoke escape through upper vents. Never place grills in direct wind tunnels between buildings.
Lighting Methods That Prevent Flame-Out
Choose the Right Ignition for Conditions
Different techniques solve specific flame-failure scenarios:
Chimney starter: Most reliable method. Fill ¾ full, light from bottom, wait 15 minutes until coals ash over. Prevents 95% of charcoal flame failures.
Electric Looft lighter: Perfect for humid days. 60-second ignition with no chemicals—just plug into an outdoor outlet.
Avoid lighter fluid in wind: Spray no more than 2–3 seconds—excess creates flare-ups that waste fuel and cause uneven burning.
15-Minute Maintenance That Prevents 80% of Flame Failures
After-Every-Cook Checklist
Following this routine stops most flame-out issues before they start:
– Empty ash catcher completely
– Brush grates while warm (easier cleaning)
– Open vents fully for 5 minutes to burn off residue
– Check burner alignment and flame pattern
– Wipe exterior to prevent rust
Seasonal Deep Clean Protocol
Every 3 months, perform this critical maintenance:
– Vacuum interior and burner tubes
– Test all gas connections with soap solution
– Replace igniter battery (even if working)
– Apply light oil coat to cast iron grates
– Inspect regulator hose for cracks
Quick Diagnostic Cheat Sheet
Charcoal Grill Dies Out
- Damp charcoal? → Dry in sun 2–4 hours or replace with premium lump
- Ash blocking vents? → Clean lower/upper vents immediately
- Coals packed too tight? → Restack loosely with ½-inch gaps
- Lid closed prematurely? → Re-light with lid open 15 minutes
- High humidity? → Use extra starter fuel, increase air intake
Gas Grill Dies After Lighting
- Tank empty/low? → Refill or replace (check via hot water method)
- Regulator in bypass? → Follow reset sequence above
- Thermocouple dirty? → Clean with steel wool
- Burner ports clogged? → Clear with wire brush
- Gas leak? → Test with soap solution—shut off immediately if bubbles form
Final Flame-Failure Fixes You Need Today
Most grills that won’t stay lit are simply telling you what’s wrong through their symptoms. Whether it’s a charcoal grill suffocating from ash-clogged vents or a gas unit trapped in regulator bypass mode, the solution usually takes under 15 minutes. Remember: A $15 thermocouple or proper vent cleaning often solves problems that seem expensive. Start with the diagnostic cheat sheet for your grill type—90% of users fix flame failure in their first troubleshooting attempt. If issues persist after following these steps, consult your owner’s manual for component specifications; most replacement parts cost under $50 and install in under 30 minutes. Don’t let another barbecue end in frustration—apply these fixes now and keep your grill burning strong all season.